
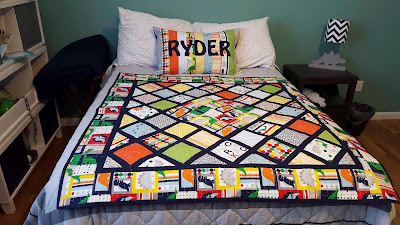
When I was designing Lucky's Under the Sea Nursery, I made him some fish throw pillows. I had so much fabric left over after making Rowdy's Quilt that I wanted to make him a pillow, too. As I was cutting for the quilt I had this vision of making a striped front with his name appliqued on the front. (At one point I considered appliqueing Rowdy's name on the back of his quilt but decided that I didn't want to hide that on the back of a quilt and it deserved to be its own project.) The decorative pillow will live on the full bed in Rowdy's room, when it isn't being used in pillow forts, that is.
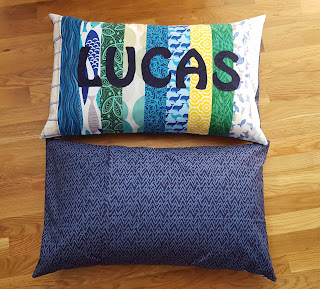

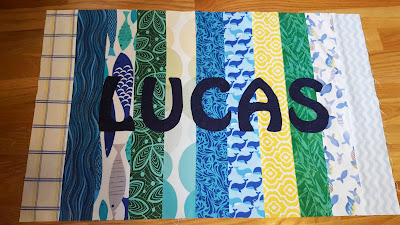
I also have fabric left over from Lucky's nursery, plus some other fabric that belongs under the sea. Why not make Lucky a pillow with his name on it, too?


The pillow forms I plan to use are 16"x26". I cut out 11 strips each 3" wide and at least 17" long. The width will be greater than 26" and the edge pieces might not be quite as wide as the rest but I wanted this to be a fast project. I plan to use the same chevron fabric for an overlapped back that I used for Rowdy's quilt.

It took longer to lay out the 11 strips than it did to sew them. Well, this isn't exactly true but it feels like it. I really wanted to take the time to balance out the colors. I sewed them together with 1/4" seams and then pressed them open.

In my first applique letter project I drew backwards bubble letters freehand. I want to make something a little more advanced for these pillows so I decided to print out the letters I wanted to use. Looking at the front fabric draped on the pillow, I decided to try to make the letters 6" tall. This should be big enough for the name to be prominent without disappearing over the curvature of the pillow.

I wanted to aim for 6" tall letters, but the font that I selected would have ended up a bit too wide to be easily read on the pillow. I reduced the font "Hobo Std" from 450 to 400 and printed out the letters again. Next, I traced the backwards letters onto the appropriate side of my EZL12 Pellon Lite EZ-Steam II fusible webbing.


My first applique project was with quilting cotton on canvas. I haven't appliqued with quilting cotton on to quilting cotton so I wanted to practice before doing it on the pillows. In order to test the applique, I made a test strip by sewing two pieces of 3" fabric together and remnant applique pieces from cutting out letters. (The blue is to test applique border colors for another project that is coming up on the blog.)


For the satin stitch in navy thread, I settled on the zigzag (stitch 8 on my machine) with width 2 and distance 0.3.
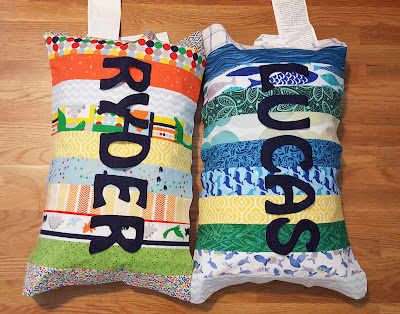

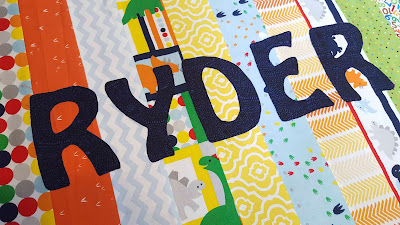
I cut the striped pieces down to be 28" x 17.5". I plan to do half inch seams all around and didn't think it was worth trimming 0.25" from either end of the pillow so on the edges I'll use a 0.75" seam. I tried to place the letters roughly centered using the stripes as a bit of a guide. I am lucky that both boys have names with 5 letters so there is a nice balance between the two pillows.

Appliqueing went much better than I thought. I was nervous that I would have some problems with the machine but everything went really smoothly.

I wanted the front of the pillows to have some more structure but I didn't want to take the time to quilt these lovely fronts I created. I trimmed the threads and then used iron on fleece (TP971F - Fusible Thermolam Plus) to stabilize the front of the pillows.

For each pillow back, I cut two pieces that would overlap to close the pillow. The large piece measured 17.5" x 20.5" and the small piece 17.5" x 14.5". I hemmed the edges of the back by pressing 1/4" and then 1/2", finishing with a straight stitch.
Oh man, i just realized that I was using a brown bobbin when I was hemming the back of the pillow edges. Thankfully it is still a dark color and you can't really tell. I don't want to rip it out and start over now that I've finished 3/4 of the hems!

I assembled the pillows as follows: Name applique right side up, large piece right side down, small piece right side down. I stitched 1/2" around all of the edges, clipped the corners and turned right side out.


I cut the striped pieces down to be 28" x 17.5". I plan to do half inch seams all around and didn't think it was worth trimming 0.25" from either end of the pillow so on the edges I'll use a 0.75" seam. I tried to place the letters roughly centered using the stripes as a bit of a guide. I am lucky that both boys have names with 5 letters so there is a nice balance between the two pillows.


Appliqueing went much better than I thought. I was nervous that I would have some problems with the machine but everything went really smoothly.


I wanted the front of the pillows to have some more structure but I didn't want to take the time to quilt these lovely fronts I created. I trimmed the threads and then used iron on fleece (TP971F - Fusible Thermolam Plus) to stabilize the front of the pillows.

For each pillow back, I cut two pieces that would overlap to close the pillow. The large piece measured 17.5" x 20.5" and the small piece 17.5" x 14.5". I hemmed the edges of the back by pressing 1/4" and then 1/2", finishing with a straight stitch.
Oh man, i just realized that I was using a brown bobbin when I was hemming the back of the pillow edges. Thankfully it is still a dark color and you can't really tell. I don't want to rip it out and start over now that I've finished 3/4 of the hems!

I assembled the pillows as follows: Name applique right side up, large piece right side down, small piece right side down. I stitched 1/2" around all of the edges, clipped the corners and turned right side out.


Finally these pillow cases are complete! I don't think they quite match what I had in my head back when I was cutting for my first ever quilt, but I am nevertheless happy with them. I still have a TON of extra fabrics from these projects, I wonder what else I should make out of them!

A final press and the pillows were ready to move into their respective rooms.


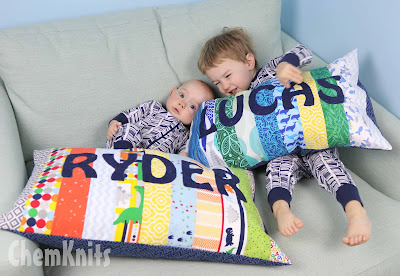
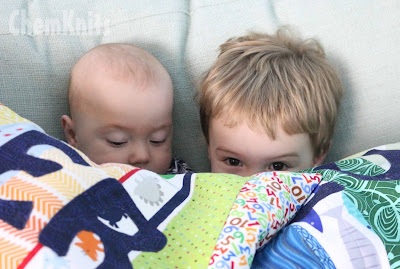
The boys were so cute that I couldn't leave you with just one picture of them playing with their pillows. I think I now have an applique bug. What else can I personalize for the boys?


A final press and the pillows were ready to move into their respective rooms.

Lucky was especially excited to have his own name pillow. He LOVES letters and can read and spell the names of our family. (Whenever we see a popular truck brand with Rowdy's name on it Lucky is very excited to tell us about it.)

Lucky really wanted his "very special pillow" to go in his crib every night but we decided that it would be best on his chair for bedtime snuggles instead. This way he can see the pillow from his crib, or at least that is the logic we used with an almost 3 year old!


7/11/16 - 7/12 cut the top fabric. 7/23/16 stitched the top strips together.
8/24/16 finished assembly.
8/24/16 finished assembly.
