Sunday, February 28, 2010

Search for Christmas Ornament Patterns

So what if I'm thinking about next year a little too soon... It is never too early to plan out your gifts! I love itsy-bitsy projects because you get the joy of a pattern completion that much sooner. Sometimes the title is enough of a description.
There are many variations on the themes of these ornaments available. Hopefully looking at the beginning of the list will inspire you for your own projects. Here is a list of charity type organizations that would accept your donations of ornaments.

Of course, anything that is cute and miniature you can turn into an ornament! Have fun turning amigurumi into ornaments.

Thursday, February 25, 2010

10 Hour Afghan Time Log

Here is the time log for my construction and design of the 10 Hour Remnant Afghan. A 5 foot square blanket in under 10 hours? How did I make that happen? Read below for the details.

I used an online stop watch to keep track of my knitting progress. I only timed the time I actually spent knitting, I would pause to take breaks, massage my hands, eat etc.

Time Log
(HH:MM:SS)
  • 00:15:50 - 3.5 rows into the project. The piece is ~23 inches wide, as best as I can tell, and about 3 inches high.


  • 00:30:35 - 8 rows in, 6 inches. Since what i'm working on will be 1 of 2 or 3 lengths stitched together, it is doubtful that this will be completed in 6 hours.
  • 00:45:58 - 13 rows, 9 inches
  • 01:24:23 - 30 rows, 22 inches long.
  • 02:02:24 - My shoulder is getting a little sore... this project is heavy! 42 rows, 31 inches. The lengths are very approximate because this blanket has so much stretch to it! I'm also beginning to worry about running out of wool, since I am only about 1/4 done with what I want. I discovered another 2 balls of the fisherman color in another stash bag, so at least I'm not going to run out of cream any time soon! I also have some yarn given to me when I was doing the knit-a-thon that I can put into this project. Maybe I was naive to think that I would be able to construct a reasonable sized blanket with only 17 balls of yarn...
  • 02:38:23 - 52.5 rows, ~35 inches (measured on wood floor so I wouldn't be stretching it). This is the row when I used up one complete ball of yarn, which means that this is when I've used up 8 balls of yarn. Since I will be doubling the width (knitting two separate panels), I cannot just work until the blanket is complete, I have to plan this out a bit better. If I want to do 100 rows (times 2), then I will need about 32 balls of yarn. Meaning that I need to order more yarn. But how much more yarn? The whole POINT of a stashbuster is to clear out my stash, I do not want to have a lot of extra remaining. I will finish these 100 rows, decide how much I will need, and then likely order a bunch more fisherman's so I can dye my own colors for the rest of the replacements. (It is more fun if I know the story behind the yarns in this project.)


  • 04:07:50 - 47 inches (measured on the floor), 79 rows.
  • 05:15:13 - Finished the first rectangle! I'm half done with the blanket. 100 rows, and the unstretched dimensions are (drumroll please), 28x60" (which is a good thing since my tape measure only goes to 60 inches!) Still have not finished the second set of 8 skeins, but we're pretty close.


  • 05:29:20 - 3 rows into the second panel I finish the second complete skein, so this project has now consumed 16 skeins of yarn. I now have to decide how much I am going to order. As I've said, I do not want to have too much extra yarn at the end of this project since this is my stashbuster. Going beyond Lion Brand Wool Ease (to other wool/acrylic blends), I have equivalent to 10 balls in my stash. I will buy 4 balls of fisherman, 1 Clove and 1 Autumn Print for $20 (including shipping). So I can start knitting as soon as it arrives, I'm going to start dyeing yarn now.
  • 06:06:34 - 16 rows on the part 2 done.
  • 06:43:51 - 34 rows completed. I'm trying to plan the colors so when I get to the end it won't be boring. I would hate to get to the end, and only have 2 colors left. I would then loose the pretty color gradients I have been creating.
  • 07:17:47- 50 rows complete. I'm now 3/4 done with the blanket! I'm not quite done with the 3rd set of 8 skeins, but it is getting pretty close. I should have some extra yarn at the end.


  • 7:37:00- 58.5 rows complete, finshed the 3rd set of 8 skeins, 24 balls used total at this point.
  • 08:25:50 - 80 rows complete. I'm in the home stretch. All hand dyed balls are now attached... hopefully they'll last long enough to make the end have the same color change variability as the rest of the blanket. My right hand is a little sore, as I've done 77 rows of this section today. It is helpful that I had to wait for more yarn to get delivered, because this is hard work!
  • 08:52:47 - I am getting creative with scraps of yarn now. I'm starting to run out of all balls, so I'm doubling up certain colors. The end of this rectangle will be very blue... 92 rows done.
  • 09:09:48 - I FINISHED THE SECOND SQUARE!!!!! WAHOO! I can now put down these huge knitting needles and take a bit of a breather. These things are huge!


  • 09:23:03 - I just finished stitching the two rectangles together. I made sure to stitch loosely so I would not loose stretchiness over the seam.
  • 09:32:46 - Finished cutting and "weaving in" remaining ends. For me, this is trimming them since when I tried to weave them in they didn't really stay. (A bit of the end would always stick out after stretching, so I gave up and just trimmed them short.) You may keep finding other ends to snip for a while.
And when time no longer matters...

I'm sitting on the couch enjoying my new blanket. It is warm, cuddly, and breathable so I don't overheat. I am so happy I finished this project in under 10 hours! I keep finding other loose ends to trim as I move the blanket around and ends pop out, but I had expected that. I cannot think of a more fun stashbuster. As I sit here, I think of the gifts I've made, and the fun I've had in my kitchen dyeing yarn.

Go to the Pattern Page of my 10 Hour Remnant Afghan

10 Hour Afghan Pattern - My Remnant Throw Blanket

So in my search for big needle blankets, I found a blanket titled "6-Hour Afghan." I wanted to make a big needle blanket of my own, using left over Lion Brand Wool Ease yarn from my sampler afghan and various other projects. Is it possible to create a blanket like this in 6 hours? See my time log to see how the project goes.

This is more of a 9 hour 32 min blanket. See my time log to understand the real time progress of this project.

Materials

About 15 balls of Wool-ease yarn from my stash. I found another 11 equivalents around my apartment, and had to order 6 others to complete the project. See more details about yardage in the Time Log.

The Pattern

  • Cast on 33 stitches using 8 strands of yarn on size 50 knitting needles.


  • All rows: K1, *P1, K1* repeat from * across. (Seed Stitch)
  • Work in the seed stitch pattern for 100 rows and bind off. This is the first rectangle.
  • Repeat to make a second rectangle.
  • Stitch the two panels together using 4 strands of yarn. Make sure to stitch loosely so you do not lose the give and stretch of this afghan.
  • Weave in loose ends. If you choose to make a remnant afghan like I did, there will be many loose ends where you switch colors. The weave is so loose that a end woven in will stick out in some place, so you may need to play with it a bit to find something that you're happy with.
  • Enjoy!

The two rectangles before stitching them together.
I am unbelievably happy with this afghan. I had no idea how much I would love it when I decided to save up my remnant yarn for this project months ago. My hands are tired, but it is 100% worth the effort. This afghan is so cozy and squishy. It was quite comfortable to stitch the two pieces together while sitting on it on the floor.


The Final Skein, 19.6 grams, or 1/5 of a ball remaining. Now this 1 ball is representatative of the 4th set of 8 balls. But the 32 ball estimation of the project is very reasonable. You could add a fringe with the leftover yarn! (I am out of fun colors so I will not be doing that.)
I made my blanket huge. The seed stitch pattern is so stretch knit on these huge needles that even half of the blanket is enough for one person to cuddle with. The blanket will stretch to accommodate your body like a hug.


An illustration of the stretchiness of this afghan. I think you would need more than 8 strands of worsted-weight wool to make a knit that isn't so loose!


A closer look at the seam


Here I've folded the blanket so you can see the amount of color variation I have within this one blanket. You could plan one out to be uniform, or use this as an excuse to clean out your stash.

--------------------------------
This this pattern was created by ChemKnits for your personal or charity use. This pattern is not to be replicated, sold or redistributed without permission from ChemKnits. © 2010 ChemKnits Please send a picture of your project to chemknitsblog@gmail.com when you've finished your afghan, I'd love to see your creation!


Note: I became a Lion Brand Affiliate in January 2018.  

Monday, February 22, 2010

Resveratrol Wine Cozy Knitting Pattern

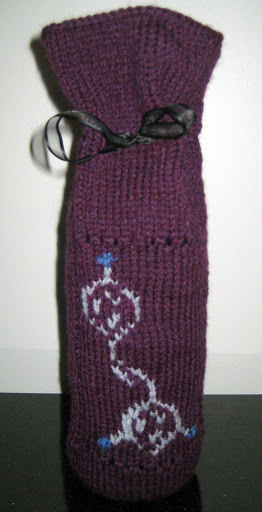
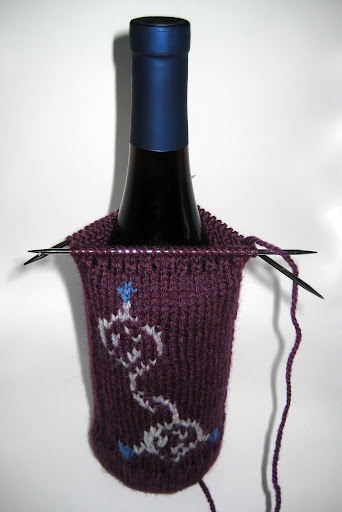
You may have heard about it on the news. Yes, this molecule has shown potential as a "fountain of youth and health" for mice. It is a natural substance found in many things including red wine. Of course, you would have to drink BOTTLES a day to consume enough of resveratrol for any biological effect. I am NOT encouraging you to take it as a supplement, but I was amused by the idea of putting it on a wine cozy!

This Resveratrol Knitting Chart is 18x38 stitches.

Materials Required
  • Miscellaneous remnants of machine washable worsted weight yarn in three colors.
  • size 3 double pointed needles (I like a tight gauge on my cozies)
  • Gauge: ~ 11 sts/2 inches; 17 rows/ 2 inches over stockinette
  • A wine bottle to check the desired fit. (Measured flat the cozy is ~5"x13")
  • Ribbon or I-cord chain for the top closure
  • Yarn needle or crochet hook to weave in loose ends


The Pattern


Row 1: Cast on 6 sts, join and knit 1 round even
Row 2: KfB across (12 sts)
Row 3: KfB across (24 sts)
Row 4: K 1 round even
Row 5: *K3, Kfb* repeat to end (30 sts)
Row 6: K 1 round even
Row 7: *K4, Kfb* repeat to end (36 sts)
Row 8: K 1 round even
Row 9: *K3, Kfb* repeat to end (45 sts)
Row 10: K 1 round even
Row 11: *K4, Kfb* repeat to end (54 sts)
Row 12: K 1 round even
Row 13: *K8, Kfb* repeat to end (60 sts)
Knit 8 rounds even (Rows 14-21)
Now we're starting the main chart part of the pattern.
Row 22: ssk, yo, *K2tog, YO* repeat from * 4 more times times, K2, *YO, K2tog* repeat from * 5 more times, K34 sts (60 sts)
Row 23: K 1 round even
Row 24: ssk, YO, K22, YO, K2tog, K34 sts
Row 25: K4, [work 18 sts of the bottom row of the chart, right to left], K until the end of the row.
Row 26: SSK, YO, K2, [Work 18 chart sts], K2, YO, K2tog, K across until the end
Repeat rows 25 and 26 (alternating rows with the YO border) until you have finished the last row of the chart. This last row should be a row 25.
Row N1: ssk, YO, K22, YO, K2tog, K34 sts
Row N2: K 1 round even
Row N3: ssk, yo, *K2tog, YO* repeat from * 4 more times times, K2, *YO, K2tog* repeat from * 5 more times, K34 sts (60 sts)
Rows N4-5: K across
At this point, the project should cover all but the neck of the wine bottle. Continue knitting rows until the project hits the bottom of the label on the neck (Approximately 15 more rows)

Next Row for tie holes: *K4, K2tog, YO* repeat from * until the end of the row.
Knit 20 more rows or until you've reached the top of the desired wine bottle.

Bind off, weave in loose ends. Find a ribbon or make a crochet chain for the bag tie. Put the cozy on a wine bottle and admire.

---------------------------------------
Abbreviations Used in this pattern:
Kfb - increase by knitting into the front and back of a single stitch.
K - knit
P - purl
SSK - decrease by slipping two stitches then knitting them together. Alternatively, you could slip one stitch, knit one stitch and pass slipped stitch over.
K2tog - decrease by knitting two stitches together.

YO - yarn over


This this pattern was created by ChemKnits for your personal or charity use. This pattern is not to be replicated, sold or redistributed without permission from ChemKnits. © 2010 ChemKnits

Thursday, February 18, 2010

Dark Mark Scarf


A while ago, I decided to search for Harry Potter related knitting patterns. Among the patterns I found, I was amazed by the Dark Mark Illusion Scarf. My younger brother is the one who got me to love the Harry Potter books years ago. This scarf is a nice way to give him a HP related gift, a subtle HP related gift!

This scarf was knit on size 6 needles using 2 skeins each of Wool of the Andes in Grass and Coal.

The designer was correct, and illusion knitting does require blocking. See the curls:


I blocked by soaking completely in water, and the pattern still remained okay. Maybe it is even more subtle now... but at least the scarf is cute on it's own!


Before blocking. I didn't have to get as low to see the illusion before. Whoops!

In playing with the scarf, it looks pretty cool with just the horizontal stripes. Cozy and Manly (thank goodness, since it is a gift for my brother!)


See the illusion? Looking at it straight (left) you cannot see the snake/skull at all! At an angle (right), however....

Today's my brother's half birthday, so I figured it would be appropriate to post it today. Happy (half) Bday, J!


This is me wearing the scarf looking down. THE DARK MARK, AHHHHHHHHHHH!

Tuesday, February 16, 2010

Not Just a One Note - Part II

I found too many "single category" books to put all in one post. Here are the rest that I found!

Latvian Mittens: Traditional Designs & Techniques by Lizbeth Upitis.

This story of a mitten tradition begins with an introduction for mitten instruction, in both English and Latvian. Every pattern is written in two languages!

There are complete patterns for some mittens, but rather than just a desciprtion for each pattern shown, there is also a chapter describing the different symbols and their meaning to the Latvian people. There are patterns from different districts. The author walks through examples of different patterns, and then the back of the book is filled entirely with different pattern charts. Of new interest: There's an interesting a looped-fringe right after the cast-on. I will have to try it!

I've been making Selbuvotter Mittens for a while now, so most of my experience comes from that book. This folk-glove/mitten tradition uses more colors, but there are similarities to the scandanaivan mittens (which were often seen in just black and white). I will need to check this out again to go into the pattens further.


Folk Mittens: Techniques and Patterns for Handknitted Mittens (Folk Knitting series) by Marcia Lewandowski

This isn't a one note... this isn't even one region! The book collects samples of folk mittens from all over the world. Although there are some similarities, there are distinct flavors to mittens from different regions. I love Selbuvotter, but although the patterns are varied, there is still a similar feel between the mittens and gloves. With this book, you can make two pairs of mittens in the same colors, and end up with products that do not look like they were made by the same person. (This is an obvious statement, since these are from different regions of the world, of COURSE the design elements would be different, but hey, I'm a scientist. I say it like I see it!)


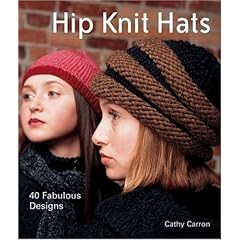
Hip Knit Hats: 40 Fabulous Designs By Cathy Carron.

I've long been an advocate that someone's first project should be a hat, not a scarf. Why? Knitting in the round is not that hard, and then you get the satisfaction of having a finished product much sooner. It is easy to visualize your progress in a hat, less so in a scarf that you want 5-6' long.

I have never seen a diverse collection of hats in one book like this before. Many of the patterns have a classic appeal, but a couple are quite unique and would get compliments when you wear them on the street.

They have you play with texture, yarn type/size, bobbles and felting. many of the hats would work just as well for men and women. The sections are divided into Caps (10), Buckets and Boxes (11), Berets and tams (6), Witty Knits (8) and Fabulous felted (5). With many photos of some of the hats, you can see how you can achieve different looks with adding multiple colors or novelty yarns.

Great source of inspiration when you are looking for something new to keep your head warm!

Sunday, February 14, 2010

The Chivalrous Love Pig


There are only two things that relate this little piglet to Valentine's Day. 1) It is pink. 2) I decided to post this project today!

This piglet was knit on hand (tea) dyed wool yarn on size 1 (2.5 mm) needles. This pattern can be found in the book World of Knitted Toys by Kath Dalmeny (along with many other really cute little animals).


Oh no! Everything knit up except for the ears and tails, and I'm out of yarn!

Dyeing your own yarn for projects is fun, and there are many advantages including the ability to make a small amount of a color for a tiny project without purchasing a whole ball. Most knitters know about the problems with dyelots, and that when you're planning a big project it is better to get too much yarn than not enough because another dyelot may not be the same color. I suppose I could achieve a pretty close color if I were to re-attempt this pink, but I need so little yarn to finish up the ears and tail that I wanted to look in my stash and find something complementary.


The knit pig body with different strands from my stash laid acorss it. From left to right, a rowan DK pink, worsted weight hand dyed wool-ease yarn, tea dyed palette, white palette yarn.

The Rowan pink was closest in color, but it was so solid that it stood out against the rest of the pig. I chose the hand dyed wool ease yarn, and divided the 4-ply worsted yarn into a 2-ply "small enough to work for this pattern" weight. You can tell when you look up close, but from afar, who would know that I didn't dye enough pink?


Big tip, sew things together with thread, not yarn. It is MUCH easier and far less bulky.

Happy Valentine's Day!