The problem with skeins of yarn is that they get tangled way too easily. After lots of practice, I finally figured out how to twist a skein into a hank. By now, you should know that after I figure out how to do something, I'm likely to create some kind of tutorial about it. I hope you enjoy my latest video!
Monday, June 27, 2011
Saturday, June 25, 2011
Garters for my Bridesmaids!
I scheduled this post, appropriately, to appear on my wedding day. At this moment, my ceremony is starting! I knit a garter for myself, and the project was enjoyable enough to create 5 more. I wanted to give my friends something special so that, if they choose, they can use it on their own wedding day.
I wanted to take into account the favorite colors of each maid. Do I expect them to wear these at their own wedding? No. But they certainly have the option to!
Getting the lengths right took some finesse, but they should hopefully fit everyone.
- Garter #1 - 16 repeats
- Garter #2 - 19 repeats (mine)
- Garter #3 - 18 repeats
- Garter #4 - 19 repeats
- Garter # 5 - 19 repeats
- Garter #6 - 19 repeats
I used Aunt lydias fine crochet thread (100% mercerized cotton, size 20). After 14 repeats of the lace on the last garter, I used up the first ball of cotton. I would be able to make 5 more with what I have left over! (For the moment, I'm done knitting lace!)
For the last two garters, I had to use a different kind of elastic. This 1/2 inch elastic is not as stretchy as the 3/8 inch version, which makes the garters less ruffled when they are at rest. So don't worry, these are still all approximately the same size - the ones with thicker elastic just LOOK much bigger.
I hope that the girls will enjoy these garters. In the next few days I'll share work in progress pictures that I had to keep to myself these past few months to keep these garters a surprise!
Tuesday, June 21, 2011
Blocking Cotton Knit Lace
The lace garters that I knit for my wedding kit up really quickly, but they do not immediately look like lace because they curl. The way I decided to block them was very effective, so I have created a video to help demonstrate how I accomplished this.
The steps:
Are you interested in other wedding knitting projects?
The steps:
- Wet the lace in the sink, and blot it dry with a towel.
- Pin the lace out on a towel or blocking mat (right side up) so it holds the desired shape.
- After allowing the lace to dry, spray the lace with starch spray
.
- After the spray has dried, remove the pins, turn the lace over and spray the wrong side.
- Use the lace however you intended.
Are you interested in other wedding knitting projects?
Saturday, June 18, 2011
Flower Knitting Charts
Knitting is not just a winter hobby. I think that we put so much focus on knitting sweaters and winter accessories that we forget to think about the amazing things we can knit for spring and summer.
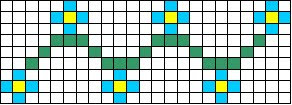
I am pleased to present to you some fun spring/summer themed knitting charts that I've created.

Sprouting Flowers: 8 x 26 sts as shown

Alternating Sprouting Flowers: 8 x 26 sts as shown

Flowering Vine 1: 9 x 23 sts as shown

Flowering Vine 2: 9 x 18 sts as shown
Stay tuned for more spring/summer themed knitting charts!
____________________________
This pattern was created by ChemKnits for your Personal or charity use. The charts and directions of this pattern are not to be republished without permission of ChemKnits. © 2011 ChemKnits
I am pleased to present to you some fun spring/summer themed knitting charts that I've created.

Sprouting Flowers: 8 x 26 sts as shown

Alternating Sprouting Flowers: 8 x 26 sts as shown

Flowering Vine 1: 9 x 23 sts as shown

Flowering Vine 2: 9 x 18 sts as shown
Stay tuned for more spring/summer themed knitting charts!
____________________________
This pattern was created by ChemKnits for your Personal or charity use. The charts and directions of this pattern are not to be republished without permission of ChemKnits. © 2011 ChemKnits
Thursday, June 16, 2011
Giving Old Knits to Charity
What you do with hand knit items that you no longer use? Should you store them in your closet indefinitely because of the time it took you to create it?
Don't hold onto a knit item just for the sake of keeping it, instead give it to someone who needs it, and would use it. You can include hand knit items with your donation of old clothes to Good Will and Salvation Army.
I am preparing for a move across the country, so Keith and I are evaluating our belongings and reducing the amount of stuff we have. My feelings aren't hurt when we choose to give away something that I knit, I would rather that my hard work be used by someone than sit in a closet unseen and unused.

Even if I don't know who they are, the hat was made with love.
Don't hold onto a knit item just for the sake of keeping it, instead give it to someone who needs it, and would use it. You can include hand knit items with your donation of old clothes to Good Will and Salvation Army.
I am preparing for a move across the country, so Keith and I are evaluating our belongings and reducing the amount of stuff we have. My feelings aren't hurt when we choose to give away something that I knit, I would rather that my hard work be used by someone than sit in a closet unseen and unused.

Even if I don't know who they are, the hat was made with love.
Today, we made the decision to donate the earflap hat that I made for Keith because it didn't fit him properly, so therefore he never wore it. Hopefully this hat will be able to keep someone warm through the winter cold.
Tuesday, June 14, 2011
Blank Mitten Chart
I love my Fenway Mitts, but I realize that some of you who are not Red Sox fans (gasp!) may want to include your own pattern on these mittens. I am therefore publishing a blank chart of the mittens so you can fill it in with your own design. (See the free Fenway Mitts knitting pattern for written instructions of the glitten construction.)
These knitting pattern was created by ChemKnits for your personal or charity use. You are not to sell, distribute or reprint this pattern without the permission of ChemKnits. © 2011 ChemKnits
Saturday, June 11, 2011
A Search for Music Related Knitting Patterns
My future husband is a guitarist, and I enjoy trying to combine his music with my knitting. Some of my designs feature guitars, but I was curious about what other types of musical knitting patterns were available. Therefore, I bring to you: A search for Musical Knits! Some of these free patterns will definitely make you sing.
---------------------
Do you have a knitting project that you are super proud of? Submit your favorite knitting projects to KPOTD. You might find yourself selected as the Knitting Project of the Day!
- Dinosaurs Playing Guitar Knitting Charts -Two rocking dinosaurs, one with a hat and the other without Inspired by the work of Frank Wu.
- Keith's Stocking with a Dinosaur Playing Guitar! - The two dinosaur charts from above are on either side of this stocking
- Keith's Guitar Chart - A knitting chart of an acoustic guitar
- Free Parking Armband - Support the band Free Parking!
- Mikkel's Piano Scarf - A scarf with piano keys stripes.
- Piano Scarf II - You will need to create a free ravelry account to view this pattern
- Piano Scarf III
- Piano Hat - Knit a hat to match your piano key scarves. You will need to create a free ravelry account to view this pattern
- Music in Heart Chart - A knitting chart with a musical note enclosed in a heart.
- Two measures of Joy - A felted bag with "Easy embroidery transforms this bag with two measures of Beethoven’s Ode to Joy." - Pattern Text
- Treble Clef Chart
- Music Illusion Scarf - You only will see the musical notes when you view this illusion scarf at an angle!
- Rock Band Pot Holders - Create the iconic rock band symbols with these knitting charts. You will need to create a free ravelry account to view this pattern
- Ipod earbud covers - These would not work for me because my ears are pretty small, but it is a cute (and FAST) project.
- Felted Guitar Strap - I will have to create one of these for Keith at some point.
- Treble Music Mittens Chart - With this chart, you can create a beautiful pair of stranded mittens.
- Fingerless Gloves "Musica" - Wristwarmers for musicians (the length should make these easy to wear as you play.)
- Note Wrist Warmers - Wrist warmers with musical notes.
- Musical Notes Dishcloth - Surrounded by a border, shown in textured K and P stitches.
- Musical Note Chart - Designed for an Ipod Cozy
---------------------
Do you have a knitting project that you are super proud of? Submit your favorite knitting projects to KPOTD. You might find yourself selected as the Knitting Project of the Day!
Wednesday, June 8, 2011
Blasts from a Knit Past
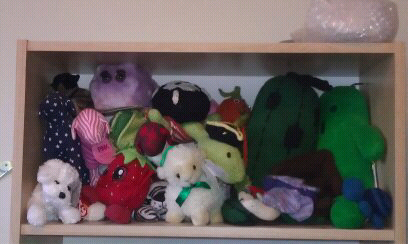
As I begin packing my apartment for a cross country move, I've come across many knitting project that I have completed over the years.

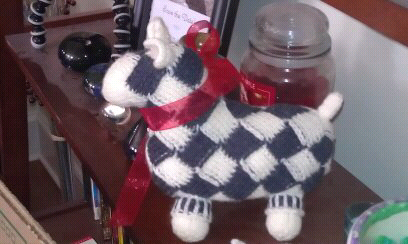
There is a shelf in our office that is dedicated to stuffed animals. Some of them are ones that I won in arcade games, an ironic Giant Microbe that I purchased before I got CFS, and my knit toys! These are all moving to Chicago with us.
It is sad to put these memories into boxes when they've been proudly on display, but I know that I will be able to find places for them in my new home.

There is a shelf in our office that is dedicated to stuffed animals. Some of them are ones that I won in arcade games, an ironic Giant Microbe
It is sad to put these memories into boxes when they've been proudly on display, but I know that I will be able to find places for them in my new home.
Sunday, June 5, 2011
What are you thankful for?
5 years ago, I graduated from college. In fact, this weekend is my 5 year college reunion. It is crazy to think how much time has passed, and where I am today. The pattern search that I'm sharing with you today is not college themed, but thinking about thanks and the holiday that we have to celebrate that thanks, Thanksgiving. These free Thanksgiving themed knitting patterns are more appropriate for Autumn than the beginning of summer, but as knitters we have to plan ahead.
So what am I thankful for? I am thankful for my education and all other learning opportunities I have had. I would even say that I am thankful for my health. Sure I suffer from chronic fatigue, but I am not in any pain and my life is not in danger, so for that I am thankful. I am thankful that I have ChemKnits and my knitting, it brings me so much joy.
So tell me, what are you thankful for?
Wednesday, June 1, 2011
Knitting with Safety Lines
There is nothing more frustrating than finding a mistake in your knitting. If you decide to unravel your work to fix the error, which is depressing in of itself, sometimes you go too far. This is especially a problem when you are working with small delicate fibers like crochet cotton in lace knitting.
Safety lines allow you to protect your knitting from dropped stitches by only allowing things to unravel to your most recent safety line. I used the safety line technique when I was working on knit garters for my wedding.
I created the following video for AllFreeKnitting.com to demonstrate how I use safety lines. The video is broken in to four sections:
Safety Lines: How to Protect Your Knitting
Safety lines allow you to protect your knitting from dropped stitches by only allowing things to unravel to your most recent safety line. I used the safety line technique when I was working on knit garters for my wedding.
I created the following video for AllFreeKnitting.com to demonstrate how I use safety lines. The video is broken in to four sections:
- Part 1 (0:02): Why use safety lines.
- Part 2 (1:01): Adding the safety line to your knitting.
- Part 3 (3:23): Knitting past the safety line.
- Part 4 (3:46): Removing the Safety Line
Safety Lines: How to Protect Your Knitting
Subscribe to:
Posts (Atom)


