Sunday, October 25, 2009

Knit-A-Thon Update

Here is my knitting update for Pine Street Inn's 3rd Annual Knit-a-Thon. (And my fund-raising plug: please join me in supporting the Pine Street Inn by making a donation.)

There are two weeks to go, and I'm at 35 squares!


I would like to thank Sherry for her generous donation of yarn. With her yarn I have made over 20 squares. I would also like to thank my pals Caroline and Jenn for learning how to knit to help out with this project. With their squares (and Keith's), we have completed a blanket plus some extra!

Please make a donation through firstgiving.

Thursday, October 22, 2009

Dyeing to Knit by Elaine Eskesen

Dyeing to Knit by Elaine Eskesen

This book is about creating, and then using, your own hand-dyed yarns. There are chapters on color theory, the dyeing procedure (many different techniques are outlined here), patterns, but most interestingly, the design phase.

I love that the book shows many examples of how to play with your hand dyed yarns to get effects other than just striping. Eskesen plays with mixing solids and multi-colored yarns,

The patterns are not the most modern looking sweaters, hats, scarves and vests, but some of the kid's sweaters have been created in vibrant colors with cute pattens making them a fun project, whether you dyed the yarn yourself or not!

There is a cute scarf showing how space dyed yarn (three colors that are dipped separately and dyed in the same batch of water) can create a pretty zig-zag effect with a textured-slip pattern. This is probably my favorite pattern in the book with the purpose of showcasing a hand-dyed yarn. I've been knitting in the round so much myself, that I haven't really thought about what knitting back and forth with a varigated yarn would create.

This book was a great read! Enjoy!

--------------------
I am knitting for the 3rd annual Pine Street Inn Knit-a-Thon on November 8, 2009. Please show your support with a donation.

Thursday, October 15, 2009

Housewarming Oven Mitts


I love making felted oven mitts for gifts. Why? It's a gift you can be fairly sure your friends will use, the knitting goes quickly and is not tedious, and, let's face it, felting is fun!

I have stocked up on a lot of KnitPicks WoTA over the last few months from other projects, and I've been wanted to play with felting smaller stripes. The problem... I have a lot of left over red and purples and my pals prefer blues and greens. I therefore decided to use some undyed WoTA, and use my food coloring to beef up the color selections. One 100g skein of the worsted weight wool became 7 new, vibrant colors!

The Mitts Colors - Day 1
  • Pale yellow: I dissolved one packet of KoolAid Lemonade into warm water, and dyed the yarn on the stovetop. I used the same water for each additional color, since the citric acid that helps with the dyeing process stays behind in the water.
  • Grey: To cleared water, I added ~6 drops of my concentrated black dye solution (from Wilton's paste dyes). My fingers were crossed for fun color separation... but alas I got grey. I am destined to get whole colors where others have failed... go figure! I know that this time I did not over-saturate the yarn with dye.... I added 1 more mL of dye to make the color a little darker.
  • Blue-green: The black did not absorb 100%. I added 3 drops neon green, 3 drops neon blue to make this pretty teal.
  • Blue: To the cleared water, I added 2 drops neon blue, 1 drop blue blue.

I was so excited to get started that I knit with WET yarn! It shows the staying power of the dye since my hands are color free! The next morning, I realized that I still wanted more colors in the mitt I was making. I decided to dye the remainder of the wool.

The Mitts Colors - Day 2
  • Purple: So my previous attempt to get purple with WoTA fingering wool was successful. No color separation (to my disappointment), but a very vibrant (almost glowing) purple. I used 1 packet ice blue raspberry lemonade, and some drops of purple. The water looked purple, but the yarn was VERY blue. I added more purple drops until I got to a total of 17. The final product... blue, blue, BLUE! How did I get purple before using this same dye mix? Well, I used vinegar as the acid last time, not KoolAid. I see an experiment coming up in my future.... So although I was hoping for a paleish purple, I got a blue which is different from the other ones I'd made, so the color was welcomed to the project.
  • Green: To the cleared water, 6 drops neon green, 2 drops yellow.
  • Pink (pale brown attempt, *achem*): 5 drops brown... it is pink. I don't have a pale pink that I"m using, so I'll use it. I found the other day that brown is good to mellow out the brightness of the food coloring dyes, but I figured that I could get a tan from it.

The Mitts

I have used this pattern before to make oven mitts. I wanted to play with mixing many colors through stripes. The pattern is random, with stripes ranging from 1-5 rows. Each time I would switch a color, I would do an "overlap." For example, if I started with 5 rows navy, I would knit 1 row grey, 1 row navy before starting the 3 rows grey.


My first oven mitt next two the un-felted housewarming mitts.

Felting on the Stovetop

I had never tried felting on the stovetop before. Since I only have access to front-loading washing machines, I usually felt in the sink... ruining my hands in the process. Stove top got mixed reviews... but I figured that before I do a lot of hand agitation I could get the fibers good and loose.

It worked better than I had expected. Yes, I did do hand agitation with dish soap, but my hands were not in hot water for a long time while I waited for the mitts to shrink. I think that overall, this process was easier on my body. You just have to be patient.

In the end
...

I'm very pleased with my stripes. The colors have dulled a bit (I noticed some yellow coming leaching out in the felting process) but I think that it helps the mitt as a whole. The white yarn did not felt very well, although the area has shrunk the stitches still have definition. (I think that white yarns tend to be bleached, so this may be the cause...?)


--------------------
I am knitting for the 3rd annual Pine Street Inn Knit-a-Thon on November 8, 2009. Please show your support with a donation.

Friday, October 9, 2009

Dinky Dyeing

My faithful readers (thank you guys!) may realize by now that I am intent on decorating my new apartment with knit items, and this includes the Christmas tree. I found a tiny penguin pattern with six different fun outfits. These creatures will be small and they require many colors for their various hats, scarves aprons and skis (!) Rather than pay $1.99 for each color that I want, I’ve decided to dye some left over Cream palette yarn myself (not to mention I can design a colorway for a tiny tiny scarf).

I need beaks and feet (yellow-orange and darker orange-orange), colors for scarves and other accessories. This gives me the opportunity to play with the Wilton's Dyes my mom brought me (that happen to be older than I am). I’ve been dying (dyeing haha!) to try the purple dye. The knitty.com article showed that the blue and pink separated in a very interesting way, I would love to get that effect myself, or else I’ll end up with true purple, which will be just as cool.

I made a bunch of small skeins about eight yards each in length of fingering weight yarn (measured by wrapping around a ruler, I’d like to try to repeat the colors if I need to. I’m a scientist, I’m used to keeping meticulous track of my protocols). The last one is only about 16 ft long, so I’ll use this to make something fun and rainbow.

The wool was pre-soaked in water. Dyes were mixed in 1 cup water and 1/2 T white vinegar. The mini-skein was added to the vinegar/dye solution, and microwaved for approximately 3 min (or until boiling). Allow the mixtures to cool slowly, then rinse with equal temp water and wash with mild soap.

Color plan

  • Red/orange - 17 yellow drops, 12 Red drops, 6 brown drops
  • Orange - 17 drops yellow, 5 drops red
  • purple - 40 drops concentrated purple dye/ paste
  • Forrest Green - 15 drops green (liquid food coloring) + 18 drops brown (concentrated paste solution) and 5 drops concentrated black solution.

Experimenting with Hot Dyeing
  • Black - 15 drops concentrated black paste solution. While the solution was hot, I added drops of other colors (red, green and blue), to see if I could get a hot dyed multi-colored effect.
  • Min-multi - in left over vinegar dye bath, bring to a boil and while hot, add about 8 drops total of different colors. This was too much dye, next time try either more wool or add fewer drops since the colors blended a lot.


I've realized now that I used as much dye here as I had to dye 50g of WoolEase... making the colors very vibrant... and I experienced no color separation (to my disappointment).

--------------------
I am knitting for the 3rd annual Pine Street Inn Knit-a-Thon on November 8, 2009. Please show your support with a donation.

Wednesday, October 7, 2009

Knit-A-Thon Update... and Keith's First Square!


Here is my knitting update for Pine Street Inn's 3rd Annual Knit-a-Thon. (And my fund-raising plug: please join me in supporting the Pine Street Inn by making a donation.)

Currently I have completed 12 squares!

Keith has always liked using my knitting needles as drum sticks, but he has always declined my offers to teach him how to knit. To my surprise, when I asked if he would like to make a square to join my donation to the Pine Street Inn, he agreed! His square went quickly, he finished it in one sitting. I am impressed by his technique for his first attempt, there are almost no mistakes in the whole square!

Keith knitting (left) and his first completed project (right).

How many squares can I make by Nov 8? Thanks to Sherry I now have plenty of wool for my project, so the limiting factor is me.


So between my 12 squares, and Keith's square we are up to a total of 13 for our household. Want to help out? You can knit 9" squares when I will bring to the knit-a-thon for you, or you can make a donation through firstgiving.

Monday, October 5, 2009

Penguins!

As part of the Christmas Stocking design project, I started looking for penguin related knitting charts. Unfortunately, most of the penguin related patterns on the web cost money, and there were not really any real charts. I couldn't resist showing the cute patterns I was able to find here:
  • Penguin Pal Hat - This won't work for a stocking... but it is sooo cute, making the top of a child's head look like a penguin head.
  • Penguin Dishcloth - looks like it could fit as a duck to me... maybe if it were in multiple colors rather than just texture?
  • Linux Illusion Penguin - for chart, for the English version
  • Pasha the Penguin - Very realistic looking stuffed buddy
  • Linux-like Penguin - super cute!
  • Penguin Jumpers - no, these don't have penguins ON them, they're FOR penguins in need of rescue after a disaster such as an oil spill.
  • Amigurumi Penguin (Crochet) - Again I wish I could crochet...
  • Penguin beadwork pattern - So the chart is not square, but maybe it could be adatpted into a knitting pattern..
  • A Penguin Chart - With some french... I think this was suposed to be a cross stich pattern, but HURRAH for a penguin chart!
  • Penguin sweater - You have to purchase the penguin pattern, but they zoom in on the penguins so you can see them well enough to use the image as a chart! (Thank you google images!)
  • Peeps Penguin pattern - Don't eat this one!
  • Stacey's Perfect Penguin - Even if I cannot find a cute enough chart for a stocking, I'm beginning to feel a theme for the ornaments I will knit for the tree!
  • Playful Dinky Penguins - Sometimes this website is down, but for now you can go and collect this pattern for tiny knit penguins (including an abominable snowpenguin)! I will be knitting these!
  • New! Feb 2010 - Chill Out Bib (complete with penguin)


--------------------
I am knitting for the 3rd annual Pine Street Inn Knit-a-Thon on November 8, 2009. Please show your support with a donation.

Saturday, October 3, 2009

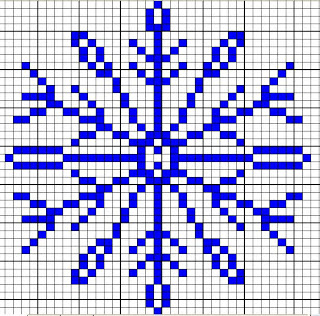
Snowflake Knitting Charts

As a child, I loved cutting pieces of paper into snowflakes and hanging them on my windows. I looked for free snowflake charts to use in my knitting projects which were beautiful. But every snowflake is an individual, so I had to try making some of my own. Enjoy!

17x23

36x41

This this pattern was created by ChemKnits for your personal or charity use. This pattern is not to be replicated, sold or redistributed without permission from ChemKnits. © 2009 ChemKnits
--------------------
I am knitting for the 3rd annual Pine Street Inn Knit-a-Thon on November 8, 2009. Please show your support with a donation.

Friday, October 2, 2009

Snowmen Knitting Charts

The holidays sure are fun! Enjoy these snowmen!


This this pattern was created by ChemKnits for your personal or charity use. This pattern is not to be replicated, sold or redistributed without permission from ChemKnits. © 2009 ChemKnits


--------------------
I am knitting for the 3rd annual Pine Street Inn Knit-a-Thon on November 8, 2009. Please show your support with a donation.