There are many ways to finish your knitting, and the I-cord bindoff can come in handy to give a decorative edge to some of your projects. I took advantage of this method in my Entrelac Sheep project.
Finishing Your Knitting: the I-cord Bindoff
Sunday, October 30, 2011
Wednesday, October 26, 2011
Fetch!
Indy loves his knit ball so much, that I have to make him some other knit dog toys for Christmas. I have loved the project, Fetch! for many years, and am excited to finally have an excuse to make it.

Now, those of you that have been following me know that my least favorite part of projects is sewing together pieces and weaving in the loose ends. I don't hate it, but if I could twinkle my nose and have it completed for me, I would jump at the chance. Therefore, whenever possible I like to knit projects in the round. If I wanted to do a two color bone, then I would knit the halves flat as instructed, but for this particular bone, I converted the Fetch! pattern to be in the round:


This project required 10 g (1/5 of one ball) of KnitPicks wool of the Andes yarn in Avocado, knitting with size 5 knitting needles.
This was a easy and super fast project. I'm glad that I decided to work it in the round! It is a shame Indy cannot have it yet. I took a picture of the bone with Indy at 17 weeks, but I didn't let him have the bone yet. It is his Christmas present, after all!


Now, those of you that have been following me know that my least favorite part of projects is sewing together pieces and weaving in the loose ends. I don't hate it, but if I could twinkle my nose and have it completed for me, I would jump at the chance. Therefore, whenever possible I like to knit projects in the round. If I wanted to do a two color bone, then I would knit the halves flat as instructed, but for this particular bone, I converted the Fetch! pattern to be in the round:
- Everywhere the pattern says to purl, knit. Also, I did each row twice (since I had both sizes of the bone fused together)
- I cast on with the magic cast on displayed in this youtube video. This would gave me 12 stitches onto two needles. This way the end of the bone would start out without a hole.

- I broke yarn and repeated the magic cast on and knit until I could start knitting the whole bone as directed in the pattern instructions.
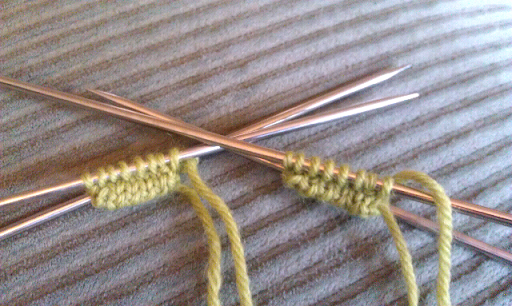
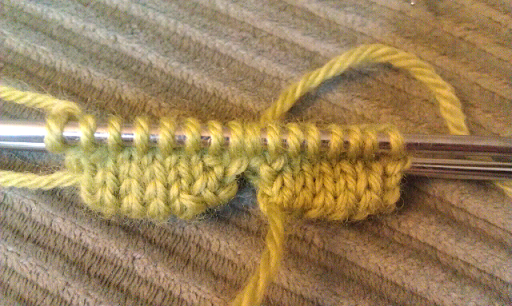
The two ends of the bone (left). I am now ready to join them together to start knitting the whole bone (right).


Finishing the bone required nothing complicated, you just deal with half of the stitches at a time.

This project required 10 g (1/5 of one ball) of KnitPicks wool of the Andes yarn in Avocado, knitting with size 5 knitting needles.
This was a easy and super fast project. I'm glad that I decided to work it in the round! It is a shame Indy cannot have it yet. I took a picture of the bone with Indy at 17 weeks, but I didn't let him have the bone yet. It is his Christmas present, after all!

Sunday, October 23, 2011
New England Patriots Logo Knitting Charts
After the Bruins chart was published, I received another email from a reader: "I loved the Red Sox and Bruins graphs on your blog........I have used the Red Sox ones and am in the process of knitting hats for my grandchildren with the Bruins logo. Would you consider doing one a small one for the New England Patriots that would be appropriate for a child's hat or mittens?"
The patriots logo has enough details in it that it was hard to make small, but I am happy to share two versions of the logo with you. The large chart would cover just over half of an adult's hat (see my generic skullcap knitting pattern for a nice template.) Ann, I hope that the small logo will work for some child sized accessories!
The patriots logo has enough details in it that it was hard to make small, but I am happy to share two versions of the logo with you. The large chart would cover just over half of an adult's hat (see my generic skullcap knitting pattern for a nice template.) Ann, I hope that the small logo will work for some child sized accessories!
Large Patriots Logo Knitting Chart: 27x56 sts

Small Patriots Logo Knitting Chart: 17x28 sts

Small Patriots Logo Knitting Chart: 17x28 sts
I am covering most of the Boston/New England teams now! (How long do you think it will be until I get a Celtics request?)
-----------------------------------
These knitting charts were created by ChemKnits for your personal or charity use. You are not to distribute or reprint this pattern without the permission of ChemKnits. © 2011 ChemKnits
Saturday, October 22, 2011
Generic Skullcap Knitting Pattern
I wanted to knit a hat that had a really fun design... but it came with no hat pattern (just the design chart.) Instead of looking up a plain skullcap knitting pattern, I decided to design my own. Why bother designing my own version? I plan to use this hat pattern as the template for future designs. It is easier for me to have the knitting kinks worked out before I start adding complex colorwork.

Materials:
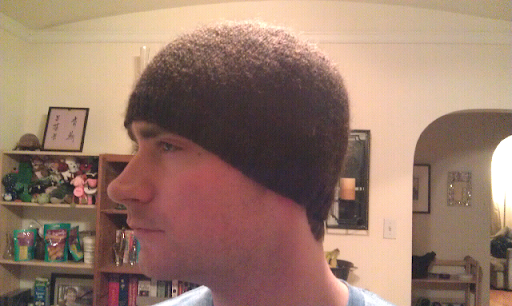
Generic Skullcap Knitting Instructions
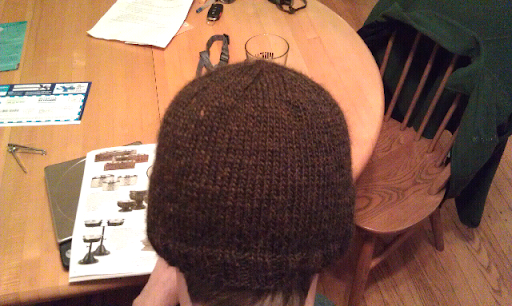
My husband reading while wearing the hat.
This was my first time knitting with Berroco Peruvia yarn, and I have to say that I LOVE it. The fabric has a really rich feeling.

Materials:
- 1 skein Berroco Peruvia yarn (100 g, worsted weight: I used 68 g in this project.)
- US Size 6 (4.0 mm) knitting needles (double pointed or circular, whatever your preference is. Recently I've started using the magic loop method so I can complete hats all on one pair of knitting needles.)
- Yarn needle for weaving in loose ends
- Gauge: 5 st/inch; 7 rows/inch over stockinette.
- Finished size: 20" circumference (It fits me loosely, but still very comfortable. It fits my husbands head well.)

Generic Skullcap Knitting Instructions
- Cast on 100 stitches on size 6 needles.
- Join to knit in the round and knit 8 rows of 2x2 ribbing (~1 inch). Note: 2x2 ribbing is *K2, P2* across the round.
- Knit 33 Rows or until piece measures ~6 inches from the cast on edge.
- Begin Crown Decreases:
- *K8, K2tog* across (90 sts)
- K 1 round
- *K7, K2tog* across (80 sts)
- K 1 round
- *K6, K2tog* across (70 sts)
- K 1 round
- *K5, K2tog* across (60 sts)
- K 1 round
- *K4, K2tog* across (50 sts)
- K 1 round
- *K3, K2tog* across (40 sts)
- K 1 round
- *K2, k2tog* across (30 sts)
- K1 round
- *K1, k2tog* across (20 sts)
- K2tog across (10 sts)
- K2tog across (5 sts)
- Cut yarn and pull through remaining stitches. Weave in loose ends and enjoy your skullcap!

My husband reading while wearing the hat.
This was my first time knitting with Berroco Peruvia yarn, and I have to say that I LOVE it. The fabric has a really rich feeling.
---------------------------------------
Abbreviations Used in this pattern:
Kfb - increase by knitting into the front and back of a single stitch.
M1 (Make 1)- increase stitch by picking up yarn between two stitches, twisting and knitting.K - knit
P - purl
I-cord - knit stitches on dpn's without ever turning the needle (effectively knitting in the round with a small number of stitches.)
SSK - decrease by slipping two stitches then knitting them together. Alternatively, you could slip one stitch, knit one stitch and pass slipped stitch over.
K2tog - decrease by knitting two stitches together.
These knitting pattern was created by ChemKnits for your personal or charity use. You are not to sell, distribute or reprint this pattern without the permission of ChemKnits. © 2011 ChemKnits
Monday, October 17, 2011
Bruins Logo Knitting Chart
I love receiving emails from readers. This morning, I got the following communication from Pat: "Thank you for sharing the Red Sox logo chart. I would like to make my grandsons a hat with the Boston Bruins logo. I have found the logo on line but it is way too big for a child’s hat. I would appreciate any help you can give me. Thank you in advance for your help."
I enjoy the opportunity to help out my readers with a project. I am therefore pleased to present you two Boston Bruins Logo knitting charts! (Hopefully the smaller chart will work on a child's hat. It may be necessary to use sport or DK weight yarn to get this to fit properly.)
I enjoy the opportunity to help out my readers with a project. I am therefore pleased to present you two Boston Bruins Logo knitting charts! (Hopefully the smaller chart will work on a child's hat. It may be necessary to use sport or DK weight yarn to get this to fit properly.)
Small Bruins Knitting Chart: 21 rows x 17 columns
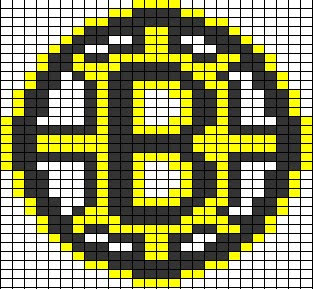
Large Bruins Knitting Chart: 32 rows x 26 columns

Large Bruins Knitting Chart: 32 rows x 26 columns
A note about the circles: Knit stitches are not symmetrical, and frequently they are wider than they are tall. Therefore, these knitting charts ave more stitches in the vertical direction than they do in the horizontal direction. The cell width I use in my knitting charts is 9 pixels high x 12 pixels wide.
-----------------------------------
These knitting charts were created by ChemKnits for your personal or charity use. You are not to distribute or reprint this pattern without the permission of ChemKnits. © 2011 ChemKnits
Saturday, October 15, 2011
Indy's Puppy Christmas Stocking
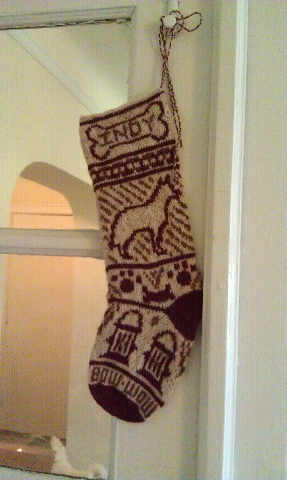
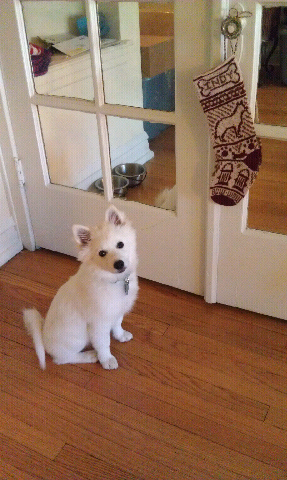
I made stockings for me and Keith last year, and now that we have a new addition to our family, Indy needs a stocking, too! I created this stocking from a series of dog themed knitting charts. The dimensions are the same as my other stockings, but I knit this with fingering weight wool instead of sport weight. (Since Indy is smaller than us, Keith wanted his stocking to be smaller, too.)
Materials
- Knitting Needles: 5 - size 1 (2.5 mm) double pointed knitting needles
- Yarn: 3 colors of KnitPicks Palette Yarn - Oyster Heather (cream, MC; 21 g), Garnet Heather (red, CC1; 15 g), and Brindle Heather (brown, CC2 - shown as pink on the chart; 7 g).

- Gauge: Not important, but tight enough so you won't see the floats
- Misc: Yarn needle
- Finished Size: 4" wide, 16" top to toe.
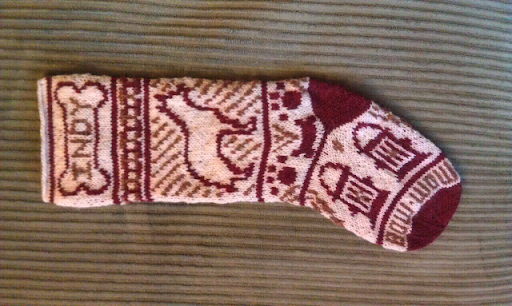
You can also access the Excel document of Indy's Stocking Knitting Chart so you can enter your own initials (Note: you will need to save the document as another file before you can edit it). Check out my tutorial on how to make knitting charts in Excel to help with making changes.
Indy's Stocking Pattern (or see the pdf print out of this page)
- Cast on 70 stitches in MC. I arranged the stitches on 4 double pointed needles as follows: 20, 15, 15, 20. There are 35 stitches per side of the stocking.
- Join to knit in the round, and begin to work the chart (see below). The stocking is knit from the top down. The first two knit rows are the first two rows in white on the chart. The chart is followed starting at the bottom, and working from right to left. I'm sure that you don't have a puppy named Indy, so when you substitute the letters with your dog's initials or name, make sure you turn them upside down so they are oriented correctly on the stocking. You may also need to extend the length of the bone. Graph paper or my tutorial about making knitting charts in excel may be helpful.
- Setting up the Afterthought Heel: After the third section (curly loops) has been completed, we will use some waste yarn to set aside stitches for the afterthought heel. This occurs after row 80, and before row 81 of the chart (see the yellow stitches below). You will have completed one complete row in CC1.
 Rearrange the stitches on the four needles as follows: 18, 17, 18, 17. Using waste yarn (I recommend using a color that is not MC or either of the CCs), Knit across needles 2 and 3. Turn the work and purl back across needles 3 and 2. The stitches that you are knitting are shown highlighted in yellow below. The stitches shaded in gray are not knit.
- Resume the chart, starting with working one complete row in CC1.
- Follow the rest of the chart until you've worked two rounds of CC1 at the bottom.
- Decreases for the toes using CC (starting with 70 sts)
- *K5, K2tog* repeat across (60 sts)
- K 1 row even
- *K4, K2tog* repeat across (50 sts)
- K 1 row even
- *K3, K2tog* repeat across (40 sts)
- K 1 round even
- *K2, K2tog* repeat across (30 sts)
- K 1 round even
- *K1, K2tog* repeat across (20 sts)
- K 1 round even
- K2tog across (10 sts)
- K2tog across (5 sts)
- Cut yarn, pull through the remaining 5 stitches and weave in loose ends.
- *K5, K2tog* repeat across (60 sts)
- Knitting the Afterthought heel (in CC1)
- Pick up 70 stitches of the CC1 that is on either side of the waste yarn, cut waste yarn and remove from stocking. (I found it easier to pick up stitches from the inside of the stocking. See below for an image from the RFR stocking.)
- knit one round even, (70 stitches). To minimize gaps, I will sometimes pick up and decease extra stitches at the edges, or else you can stitch these closed after you finish the heel.
- Decrease as instructed for toe decreases
- Pick up 70 stitches of the CC1 that is on either side of the waste yarn, cut waste yarn and remove from stocking. (I found it easier to pick up stitches from the inside of the stocking. See below for an image from the RFR stocking.)
- Braided tie
- For the tie, I cut 3 - 24" pieces of yarn (1 from each color) and braided them. I then wove these into the hanging corner (I went in and out of the knit fabric more than one time so it would be sturdy when hung).
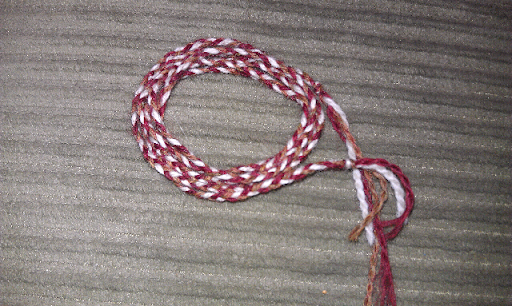
- Tie a bow, hang and admire! (I used a bow rather than a loop so I would not be limited to hooks to hang the stocking)
- For the tie, I cut 3 - 24" pieces of yarn (1 from each color) and braided them. I then wove these into the hanging corner (I went in and out of the knit fabric more than one time so it would be sturdy when hung).
- Finishing - Weave in all loose ends. Gently block the stocking to get the desired shape. I lightly stitch the top of the stocking closed during blocking to help eliminate the curl.

The pre-blocked stocking

I have to put a cage over things that I block so Indy won't think they belong to him. Even though this stocking DOES belong to Indy, I don't want him to tear it up!
- Indy's Ball Chart
- Other dog knitting charts (those used in this stocking and extras) will be published at ChemKnits soon!
Pictures through the construction
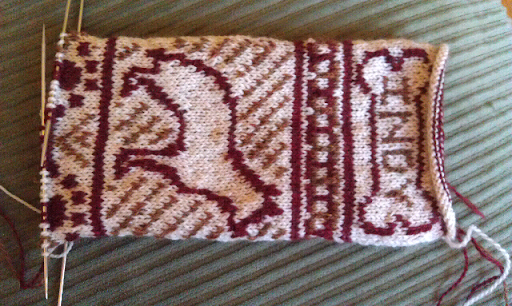
I am THRILLED with the way the dog silhouette came out!
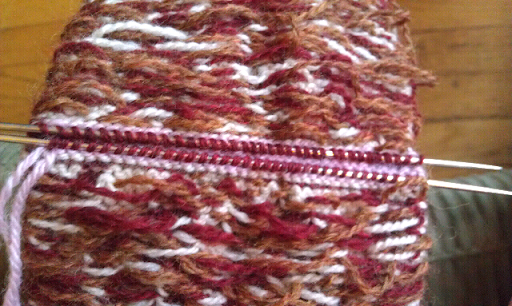
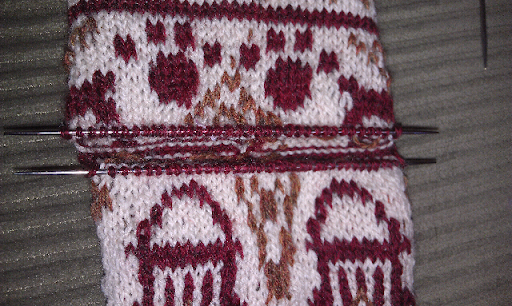
Picking up stitches for the afterthought heel
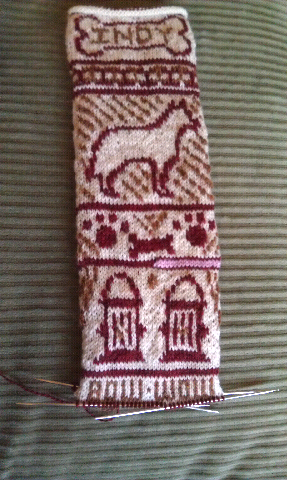
Just before the toe decreases
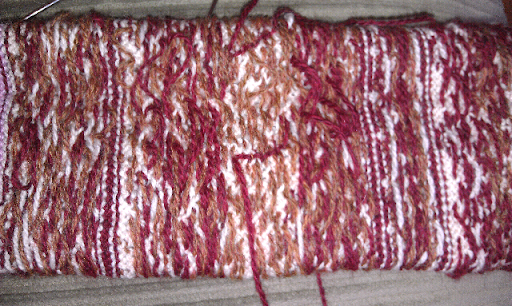
This was my first time knitting with three colors all at once, at least for an extended project (rather than just a few rows.) I have to say that I prefer knitting with two colors at a time... it goes MUCH faster!
---------------------------------------
Abbreviations Used in this pattern:
Kfb - increase by knitting into the front and back of a single stitch.
M1 (Make 1)- increase stitch by picking up yarn between two stitches, twisting and knitting.
K - knit
P - purl
I-cord - knit stitches on dpn's without ever turning the needle (effectively knitting in the round with a small number of stitches.)
SSK - decrease by slipping two stitches then knitting them together. Alternatively, you could slip one stitch, knit one stitch and pass slipped stitch over.
K2tog - decrease by knitting two stitches together.
This knitting pattern was created by ChemKnits for your personal or charity use. You are not to distribute or reprint this pattern without the permission of ChemKnits. © 2011 ChemKnits
Wednesday, October 12, 2011
Search for Dog Toy Knitting Patterns
Indy has quickly become family, and as family I need to figure out what to knit him for Christmas. It is too soon to deal with dog sweaters, since Indy is still growing (not to mention that Eskies have a very thick coat!) I designed a knit dog ball for Indy when he first came home, but I wanted to see what other types of toys I could create for him.
You know what the best part about knitting Christmas presents for a puppy is? There is no chance he'll read my blog, so I can post all I want about those projects before December and the surprise won't be ruined! I hope that this list of free dog toy knitting patterns will help you create something amazing for your special friend.
- Indy the puppy's ball - This is a toy that I designed for my new American Eskimo puppy, Indy. The ball can be felted or left unfelted, and has a design of I's going around the middle of the ball. I have also provided a blank chart for the ball so you can create your own design for your puppy.
- Quack: knitted duck toy - This duck shaped dog toy has an overall shape like a bowling pin (with feet), but the coloration turns it into a duck. I particularly like the mallard version!
- Fetch! - Little bone toys for your puppy. These are knit as two pieces, and then stitched together before stuffing. The designer includes an important note about hand knit dog toys: "This toy is intended to be used only with owner’s supervision. Do not leave your pet unattended with such toys because if ripped apart or damaged it could pose as a choking hazard. Check toy regularly for signs of wear and replace if necessary."
- Incredibly Easy Knitted Dog Toy - This dog toy is knit flat and then seamed up to create a 3D toy. I cannot tell what the shape is supposed to be, and the designer doesn't have much of a description. My best guess is that it is some kind of rabbit.
- Puppy's Dumbell Toy - A felted dumbbell shaped dog toy. Knit in the round (so there is no sewing at the end.)
- Felted Dog Bone - Big and flat. Looks like a dog would love to chew on this! Knit as two pieces and then sewn together before stuffing.
- Out of Yarn - A six-sided entrelac ball. You will need to create a free Ravelry.com account to download this free dog toy knitting pattern.
- Gevlochten Bal / Braided Ball - This ball looks like it could be entrelac, but closer inspection shows that it really is braided from a bunch of pieces. Some sewing is required. You will need to create a free Ravelry.com account to download this free dog toy knitting pattern.
- Judy's 12-section Yarnball - This ball is knit flat with short rows. I can see my puppy loving it!
You know what the best part about knitting Christmas presents for a puppy is? There is no chance he'll read my blog, so I can post all I want about those projects before December and the surprise won't be ruined! I hope that this list of free dog toy knitting patterns will help you create something amazing for your special friend.
Sunday, October 9, 2011
Blank Ball Chart
What if you want to put an all over design on a ball? Use this blank knitting chart to insert a pattern onto the entire ball.
Update 9/17/2012 - The old blank ball chart did not take into account the increases and decreases properly. I have updated the chart including symbols for the KFB and K2tog's.

The cast on edge is at the bottom, and you knit from right to left, bottom to top. Print out and have fun with your colored pencils to come up with some designs.
Keep in mind that the pale yellow row is created from increases (*K4, Kfb*) and the pale blue line will be in the decrease round (*K4, K2tog*). This is why I used the space of 6x36 for my chart on Indy's ball.
---------------------------------------
This knitting chart was created by ChemKnits for your personal or charity use. You are not to sell, distribute or reprint this pattern without the permission of ChemKnits. © 2011 ChemKnits
Saturday, October 8, 2011
Indy's Ball (A Knit Dog Toy)
I welcomed Indiana with a knit puppy ribbon, but I wanted to design something for him that he could actually play with. I am therefore pleased to present Indy's Knit Toy Ball! *Note: With all handmade dog toys, please supervise your pet while he plays with them.
Update October, 2012: There is now a new design of Indy's Knit Puppy Toy - Check out the Jack-o-lantern version!
Materials
- Knitting Needles: 4 dpn Size 7
- Yarn: Misc. scraps of KnitPicks Wool of the Andes in 3 colors
- Gauge: Not important for the completed project
- Misc: yarn needle, polyfill stuffing and materials for hand felting.
- Finished Size: ~2.5" diameter (unfelted) ~2" diameter felted.
Knitting Instructions
Row 1: Cas on 6 stitches. Join to knit in the round
Row 2: Kfb across (12 sts)
Row 3: *K1, Kfb* across the row (18 sts)
Row 4: K across
Row 5: *K2, Kfb* across (24 sts)
Row 6: K across
Row 7: *K3, Kfb* across (30 sts)
Row 8: K across
Row 9: *K4, Kfb* across (36 sts)
Rows 10-15: Work the 6 rows of the chart, knitting across.
The "flat" space on the ball for design is 36 sts x 6 rows.
Row 16: K acrossRow 17: *K4, K2tog* across (30 sts)
Row 18: K across
Row 19: *K3, K2tog* across (24 sts)
Row 20: K across
Row 21: *K2, K2tog* across (18 sts)
Row 22: K across
Row 23: *K1, K2tog* across (12 sts)
Row 24: K2tog across (6 sts)
Stuff the ball, cut yarn and pull through remaining stitches. Weave in loose ends. Felt (if desired).
How to felt Indy's Ball in the Sink:
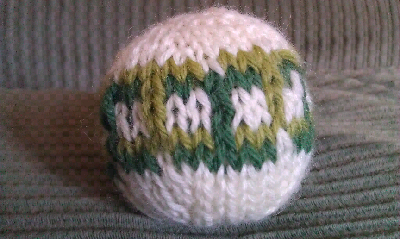

Indy's knit ball - before and after felting.
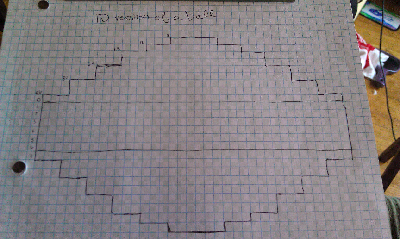
A 2D rendition of the ball. Of course, with the increases and decreases, this is not how a ball cut flat would work, but it was useful for me when I was considering my design.
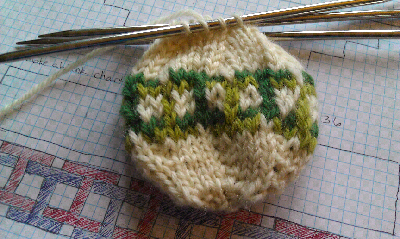
The ball before it has been stuffed, laying on top of my original design. I think it's pretty cool that the size of the stitches are really close to my graph paper!


Indy with the unfelted ball
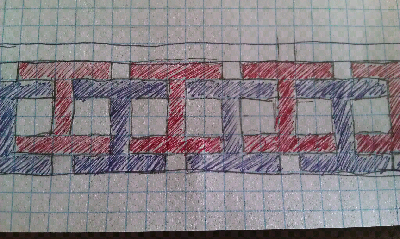
My initial sketch for the pattern on the ball. I love the way it came out! I have provided a blank ball chart so you can make your own design.
Indy playing with the unfelted ball:
Indy playing with the felted ball:
---------------------------------------
Abbreviations Used in this pattern:
Kfb - increase by knitting into the front and back of a single stitch.
M1 (Make 1)- increase stitch by picking up yarn between two stitches, twisting and knitting.K - knit
P - purl
I-cord - knit stitches on dpn's without ever turning the needle (effectively knitting in the round with a small number of stitches.)
SSK - decrease by slipping two stitches then knitting them together. Alternatively, you could slip one stitch, knit one stitch and pass slipped stitch over.
K2tog - decrease by knitting two stitches together.
These knitting pattern was created by ChemKnits for your personal or charity use. You are not to sell, distribute or reprint this pattern without the permission of ChemKnits. © 2011 ChemKnits
Thursday, October 6, 2011
Vote for Indy!
We have entered our puppy, Indy, in a costume contest through PetSmart. I am writing to ask all of you faithful ChemKnits readers to please go to facebook and vote for Indy to win the cutest critter award.

We don't expect to win anything, but I think that this little Eskie Cow shown in "Grazy Sunday" is cute enough to share with the world! And maybe next year I'll be able to knit Indy's dog costume (I don't want to knit him any clothing until he's finished growing!)

We don't expect to win anything, but I think that this little Eskie Cow shown in "Grazy Sunday" is cute enough to share with the world! And maybe next year I'll be able to knit Indy's dog costume (I don't want to knit him any clothing until he's finished growing!)
Tuesday, October 4, 2011
Freestanding Knit Mustache
 Halloween is just around the corner, but having a knit mustache isn't just a Halloween knitting project. Mustache knitting patterns have been taking over a storm, as has wearing fake mustaches. I wish I could remember the event, but there was something in Cambridge a few years ago where people wore fake mustaches to support a cause.
In any event, after making my search for free mustache knitting patterns, I was inspired to design one of my own. I hope you enjoy my take on a free standing mustache.
Materials
- Knitting Needles: 3 dpn Size 1 (2.25 mm)
- Yarn: Hand dyed KnitPicks Palette yarn
- Gauge: Not important for the completed project
- Misc: yarn needle (for weaving in loose ends)
- Finished Size: ~4 inches long

Instructions - The chart to the right represents half of the knit mustache. It is knit in the round to give it some more volume.
 Cast on 4 stitches (onto 2 double pointed needles). Join to knit in the round.
- K2tog (knitting into the front and back of those two stitches), Slip 1, Kfb, pass slipped stitch over (PSSO) the two stitches. (4 sts)
- Repeat round 2
- Kfb, K2, Kfb (6 sts)
- Kfb, K2tog, SSK, Kfb (6 sts)
- Repeat round 5
- K across
- K across
- Kfb, K4, Kfb (8 sts)
- K across
- K3, Kfb, Kfb, K3 (10 sts)
- K across
- Kfb, K3, Kfb, Kfb, K3, Kfb (14 sts)
- K across
- K6, Kfb, Kfb, K6 (16 sts)
- K across
- K across
- K across
- *SSK, K4, K2tog* twice (12 sts)
- K across
- K4, K2tog, SSK, K4 (10 sts)
- K3, K2tog, SSK, K3 (8 sts)
- SSK, K4, K2tog (6 sts)
- K1, K2tog, SSK, K1 (4 sts) This is the center portion of the knit mustache
- K1, Kfb, Kfb, K1 (6 sts)
- Kfb, K4, Kfb (8 sts)
- K3, Kfb, Kfb, K3 (10 sts)
- K4, Kfb, Kfb, K4 (12 sts)
- K across
- Kfb, K4, Kfb, Kfb, K4, Kfb (16 sts)
- K across
- K across
- K across
- K6, K2tog, SSK, K6 (14 sts)
- K across
- *SSK, K3, K2tog* twice (10 sts)
- K across
- K3, K2tog, SSK, K3 (8 sts)
- K across
- *SSK, K4, K2tog* twice (6 sts)
- K across
- K across
- SSK, Kfb, Kfb, K2tog (6 sts)
- Repeat round 43
- SSK, K2, K2tog (4 sts)
- S1, Kfb, PSSO both stitches; K2tog - knitting into the front and back of both stitches (4 sts)
- Repeat round 46
- Cut yarn, and pull through remaining stitches. Weave in loose ends.
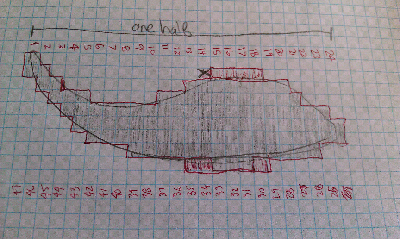
The original sketch of this mustache. I drew the curvature I wanted, and then "pixelated" it with the graph paper.
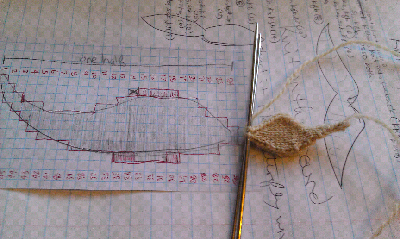
The knit mustache fits my original design pretty well (of course, much smaller!)
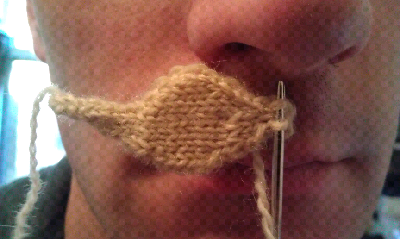
Sizing up the half mustache on Keith's face.
I received a question about knitting in the round on two double pointed needles. This is keeping the live stitches on two needles and knitting with the third needle. I hope this video helps clear things up!
Abbreviations Used in this pattern:
Kfb - increase by knitting into the front and back of a single stitch.
M1 (Make 1)- increase stitch by picking up yarn between two stitches, twisting and knitting.
K - knit
P - purl
I-cord - knit stitches on dpn's without ever turning the needle (effectively knitting in the round with a small number of stitches.)
SSK - decrease by slipping two stitches then knitting them together. Alternatively, you could slip one stitch, knit one stitch and pass slipped stitch over.
PSSO - Pass Slipped Stitch Over
K2tog - decrease by knitting two stitches together.
This knitting pattern was created by ChemKnits for your personal or charity use. You are not to distribute or reprint this pattern without the permission of ChemKnits. © 2011 ChemKnits
Subscribe to:
Posts (Atom)


