Saturday, February 25, 2012

ChemKnits Site Redesign - Please Excuse the Mess!

Dear ChemKnits Readers,

One of my resolutions for 2012 was to take time to redesign the ChemKnits blog. I naïvely selected the dark background and light background when I started the blog, not realizing that it can be hard on the eyes.

Please excuse the mess as I work on a new layout and design for this website. None of the posts are going away, but there may be some issues with font color (i.e. pastel text on the new white background.) If you notice areas of the site that did not go through the transition properly, please bring it to my attention through a comment on that post (or this one.)

Thank you all for being such faithful readers of this site!

Sincerely,
Rebecca Brown, owner of ChemKnits


P.S. I need to make one final plug for my friends Alan and Caroline as they prepare to run for the Boston Museum of Science Traveling Program. ChemKnits is donating the ad revenue for the month of February to the cause, but I would like to encourage you to sponsor Caroline and Alan, too.

Rosalie's Knit iPad Case


I love my mom very much. She loves the colorwork that I do, but since she lives in Florida she has no need for hats or mittens. We thought for a long time about a project that would work well for her, and finally settled on designing an iPad cover with a zipper closure.


The dimensions of the Generation 1 iPad are 9.56 in (243 mm) (h), 7.47 in (190 mm) (w), .5 in (13 mm) (d). Mom requested the case be a little bigger than the iPad to make it fit loosely. If you want a tighter fit, then you can achieve this by adjusting your gauge.

Materials

  • MC: 2 balls KnitPicks WOTA Coal (50 g/ball; 58 g consumed in this project) Note: KnitPicks just released new colors of Chroma, including Black and Gray. Next time I would choose one of these as the MC in stead of Wool of the Andes.
  • CC: 1 ball KnitPicks Chroma Worsted in Galapagos (100g/ball; 34g in this project)
  • Size 6 round knitting needles, or size needed to obtain gauge.
  • 12" Zipper (I would err on the side of getting a zipper too large and then letting some of the end hang into the case.)
  • Yarn needle to weave in loose ends
  • Sewing needle and Black thread to sew the zipper onto the case.
  • Gauge: A gague of 22 sts/4 inches; 18 rows/3 inches will give an iPad case that is 10" x 8". I purposely knit this case looser so it would be larger per my mother's request. I knit this case with 20 sts/4 inch; 15 rows/ 3 inch for final dimnesions of 11.5x 9.5 inches.
  • Finished Size: depends on gauge (see above)

The Chart

The chart is 49 rows x 112 stitches. Click on the link to open the chart in a new window to view it larger. This chart is also available as a downloadable PDF so you can get better resolution.


The Pattern
  • Cast on 112 stitches in MC (If you did a long tail cast-on this can count as row 1 of the chart)
  • Start the chart, working from the bottom up, right to left. (49 rows).
  • Bind off knitwise.
  • Finishing: Loosely stitch the base of the case together, making sure to align the two different sides properly. Tip, I basted up the sides of the case with the right side out, and then flipped it inside out to sew up the bottom. This made sure that I stitched the bottom closed in the correct orientation.

    The case, before (left) and after (right) sewing the bottom closed.

  • Weave in all loose ends.
  • If necessary, lightly felt the case if you need to reduce the size.
  • Block the iPad case, then sew in the zipper. Tip: Pin the zipper to the bind off edge to the first size zipped close, then unzip the zipper to pin it to the other size. Test opening and closing the zipper to make sure it is aligned correctly before you start sewing it on.

Other Pictures From the Construction:

I ran out of yarn with 3.5 rows to go. :( I thought I had more coal WOTA around, but I guess I was mistaken.


Where I was in the iPad case when I ran out of coal WOTA.

To block the case, I just pinned the top edge closed and laid it flat to dry.

Blocking will help the curling edges.

--------------------------------------
Abbreviations Used in this pattern:
Kfb - increase by knitting into the front and back of a single stitch.
M1 (Make 1)- increase stitch by picking up yarn between two stitches, twisting and knitting.
K - knit
P - purl
I-cord - knit stitches on dpn's without ever turning the needle (effectively knitting in the round with a small number of stitches.)
SSK - decrease by slipping two stitches then knitting them together. Alternatively, you could slip one stitch, knit one stitch and pass slipped stitch over.
K2tog - decrease by knitting two stitches together.

This knitting pattern was created by ChemKnits for your personal or charity use. You are not to sell, to distribute or reprint this pattern without the permission of ChemKnits. © 2012 ChemKnits

Wednesday, February 22, 2012

Alan's Goomba Hat

My friends Caroline and Alan are running the Boston Marathon in April to raise money for the Museum of Science Traveling Programs. Please support them as they train to run for such a worthy cause by donating in honor of Alan's birthday!


Alan and Keith used to be roommates, and we spent many evenings hanging out in Alan's room playing random internet video games. (Well, I'd watch, the boys would play.) When Alan got his Wii, we spent a lot of time playing Mario Galaxy together (I would use the second controller to get the stars. Woot!) I thought it would be appropiate to make Alan a Goomba hat for Christmas.


Now the Goomba hat pattern included the chart for the hat, but did not include instructions for the hat itself. This knitting project was the basis for my design of a Basic skullcap knitting pattern. Could I have found an existing hat pattern? Of course. However, I wanted to design my own basic hat knitting pattern that I would be able to use as the base for future hat designs (Such as the ombré hat.)


The hat that I show in the generic skullcap knitting pattern is the base of this Goomba hat. I knit the hat on size 6 knitting needles with Berroco Peruvia (68 g of yarn were consumed.) I used KnitPicks Wool of the Andes for the duplicate stitched chart.

Happy Birthday, Alan! Why don't you give Alan a great birthday present by sponsoring his Boston marathon run for the Museum of Science?

Monday, February 20, 2012

A Little Knit Alien

Happy Birthday, Keith! One of our first date weekends this year was to watch the entire Star Wars Saga on Blu-Ray. This little figure that I made for Keith's birthday doesn't have anything to do with Star Wars itself, except that Star Wars is on my brain as I write this post about a little knit Alien.


I knit the Alien with size 5 knitting needles and KnitPicks Wool of the Andes worsted weight yarn in Grass. I stared with 9 grams of yarn, and ended up with just over 1 yard remaining... too little for the scale to register! (To be fair, I did have another ball of Grass in the house so I wasn't worried about running our of yarn.)


The little Alien body looks like a cute little person. You could use this as the base for the creation of a number of different characters.


I used construction paper to make the eyes and glued them onto the Alien. So cute!

Wednesday, February 15, 2012

ChemKnits QR Code

This was a fun little project, but I have to start off by saying that I am having troubleshooting issues with the knit QR code. My camera currently does not recognize it as a QR code at all. I know my chart is correct since that works. I decided to go ahead and publish this project anyway because the design is pretty cool. If you have any suggestions for troubleshooting this design, please let me know!

qrcode
QR code generated at http://qrcode.kaywa.com/

Materials
  • 1 ball KnitPicks Chroma Worsted in Galapagos (CC - 5 g consumed)
  • 1 ball KnitPicks WOTA Coal (MC - 11 g consumed)
  • Size 3 knitting needles
  • Gauge - Not improtant for this project
The Chart
29x29 sts


The Pattern
  • Cast on 35 sts in MC
  • Purl (P) 1 row
  • Knit (K) 1 row
  • Odd Chart Rows (WS): P3 sts, work 29 sts of chart (p wise), left to right, P3
  • Even Chart Rows (RS): K 3 sts, work 29 sts of chart (bottom to top, right to left), K3
  • Continue working chart, knitting on even RS and purling on odd WS rows with a 3 stitch border on either side.
  • K 1 row
  • P 1 row
  • Bind off K wise.
  • Block and weave in all loose ends.
Now I cannot take credit for making a QR TAG out of yarn, I found a picture of a crochet QR tag on flickr. I tested this image, and Google Goggles does recognize it as a bar code.
What could the problems be?
  • I may have made a mistake in the knitting. I plan to overlay the chart over the image of the knit QR code to check.
  • The stitches may be too small. Maybe they're too uneven, or maybe I need to make each individual pixel bigger.
  • Maybe the yarn is too fuzzy, and the stitches do not have enough definition.
My plan was to make a laptop skin for my chromebook that had the knit ChemKnits QR tag on the back. Thankfully, this only took a morning to knit, so it is not a wasted experiment.

---------------------------------------
Abbreviations Used in this pattern:
Kfb - increase by knitting into the front and back of a single stitch.
M1 (Make 1)- increase stitch by picking up yarn between two stitches, twisting and knitting.
K - knit
P - purl
I-cord - knit stitches on dpn's without ever turning the needle (effectively knitting in the round with a small number of stitches.)
SSK - decrease by slipping two stitches then knitting them together. Alternatively, you could slip one stitch, knit one stitch and pass slipped stitch over.
K2tog - decrease by knitting two stitches together.

This knitting pattern was created by ChemKnits for your personal or charity use. You are not to sell, to distribute or reprint this pattern without the permission of ChemKnits. © 2012 ChemKnits

Saturday, February 11, 2012

BU Hats


My in-laws have affiliations with Boston University, so I decided to make them both BU themed hats for Christmas. Both hats were knit with KnitPicks Wool of the Andes worsted weight yarn in red and white.


Hat 1: Zsportz


This hat consumed 32 g of the red wool and 30 g of the white wool.

This was the first project that I knit with my KnitPicks options sampler kit, using one of the metal tips (size 7) on a 24" circular set (except for the cast-on and edging which were knit with the size 6 harmony wood needles.) I LOVE how flexible the cable is! 24" circulars are a little long for this project... I wish they had a shorter cable available for purchase. hurrah for the magic loop method.


The decreases weren't shown in the chart the way they were written, but the adjustment was simple. K8, K2tog (where the first K2tog is at the indicated position.) k 1 row, then K7, K2tog. (you want the second st of K2tog to be the same each time).


I wish that I had used smaller needles and more stitches... It is a cute hat, but the floats distort it a bit when it is on a head.


Hat 2: Opus Spicatum


This hat consumed 30 g of the red and 26 g of the white wool.

From the zsportz hat my gauge is 22 sts/4"... too tight for this pattern. I felt like that was a pretty loose gauge, and don't want to go up to bigger needles. I don't really mind if it comes out more of a beanie than a beret. Since there is a big increase in stitches after the brim, I used size 7 knitting needles for the whole project.


The rhythm of the pattern really easy to get into. Since there are no long floats, I like it MUCH more than the other hat. I think making it a beanie, I would shorten the brim more next time. I like the thicker brim for a beret. I was concerned that the hat would be too short, so I knit 4 extra rows of the zig zag pattern before starting the decreases.
____________________________


I am really happy with the way these hats came out!

Thursday, February 9, 2012

Sam's Hat

Happy Birthday, Sam! Welcome to the 28 club.


Sam spends a lot of time biking in any kind of weather, and I wanted to make something for him that would be very warm, so I selected the Stripy Hat Knitting Pattern. Stranded projects tend to be warm to begin with, but this hat has a turned under brim!

I knit the hat on size 6 needles with Lion Brand Wool (Color 201; 3 ply, 2 strands dark brown, 1 strand natural white) and Oyster Heather (KnitPicks Wool of the Andes). 48g were consumed of the Lion Brand yarn, and 33g of the Oyster Heather.

Notes from working on the pattern
  • In the row where I was directed to increase 12 stitches, I *K8, M1* across until the last 4 stitches (112 sts total). I did this in the stranded pattern.
  • I messed up the striping pattern initially, but I realized this when I was on round 2 past the purled edge. Thankfully, I only had to drop 2 stitches and work them back up with a crochet hook to correct my mistake. I'm glad I realized this NOW and not later! The messed up floats will be hidden under the inside brim, so no one will even know (unless they read ChemKnits.)
  • Instead of knitting 38 rows in pattern, I only knit 30 (where it measured just over 13 cm from the purl row.) The original hat was designed for a 12 yr old, but from measuring the hat on my own head and looking at the number of rows left through the decreases, I think this should be sufficient.
I thought the hat looked pretty cute with the curled brim. This is more common in baby hats than adult hats, and wouldn't give the warmth I wanted for Sam's hat, so I went ahead with folding the brim under.


I pinned the brim down before starting sewing. I wanted to make sure that I preserved the elasticity of the hat, so I made my stitches at an angle (rather than just stitching straight across.)

Wednesday, February 8, 2012

Seahorse Mittens


Happy Birthday, Laura! I made a hat for Laura about a year ago, so I wanted to do something different for her Christmas present. The "Selbuvott or not" alias Selbu Sea Horse Mittens knitting pattern spoke to me. It is a stranded project, but more modern. I made a few modifications to the pattern which I will detail below.

I printed the charts out to cut and paste them together to be on a single page. Unfortunately when I lined them up, the alternative palm charts didn't line up with the seahorses. 105% magnification worked for the left miten, 110% was still too small for the right, 115% too big.... 113% was just right (that only took me 4 tries...)


I used size 1, 2.5 mm double pointed knitting needles and KnitPicks palette yarn in Cosmopolitan (27 g) and Blue Note Heather (34 g).

The only thing I didn't like about this pattern was the ribbed cuff. I'm using a chart found on p71 of the 2007 edition of SELBUVOTTER: Biography of a Knitting Tradition(Chart A from Annemor #12) Above and below it, I am going to use the arrow charts by the designer (but going in alternate directions.) (I was lucky when I chose this chart that is a 12 stitch repeat. The cast on for this glove is 60, whereas the seahorse mittens are only 48) Looking at the stitch count, I decided to start at 60 sts because this made gloves to fit my hand in the past. I proceeded with the cuff as follows:
  • start with 4 rounds of K2, P2 (cast on 60 sts)
  • Knit 1 round across in MC
  • 1 round CC, Left mitten chart from this pattern, 1 round CC
  • 1 round MC
  • Chart A from annemor #12 (just the middle part)
  • 1 round MC
  • 1 round CC
  • Then do opposite direction chart (for the left mitten, then the right handed chart and vice versa.)

I love this modified cuff pattern. I really want to turn this into fingerless mittens.


My gauge is getting bigger. When I compare these mittens to Keith's and then mine, these ended up being a lot bigger. Laura's hands are bigger than mine, and these aren't outrageously huge on me... In the lost package, there was a note where I said I would felt these down a bit if they were too big for her. Maybe I should start using smaller needles for these projects...


I loved the way the hot pink in the blue note heather played against the bright pink of the cosmopolitan. The charts were fantastic, and I hope that I can design mittens that are this brilliant in the future.

Sweet Caroline

My friends Caroline and Alan are running the Boston Marathon in April to raise money for the Museum of Science Traveling Programs. Please support them as they train to run for such a worthy cause by donating in honor of Caroline's birthday!


I selected the Cabled Rangoli Hat for Caroline because I loved the texture and femininity of it. This isn't a warm hat for biking, but a cute hat for a not-so-cold day. I expected the hat to be more like a tam or beret, but it fits more like a beanie. I love the beauty of the flower when you lay the hat flat.


I knit the hat on size 5 round (and then double pointed knitting) needles with KnitPicks Wool of the Andes yarn in Wonderland Heather. The hat consumed 67 g (~1.4 balls) of yarn. I followed the pattern as directed until the very end where I repeated row 43 one more time so there were only 8 sts to pull together.


This hat fit well without blocking, but I decided that I may as well block it. I am really learning how taking the time to block knitting projects gives them a great finished look.


When I showed Caroline the picture of her hat (stupid USPS for preventing me from physically giving it to her), she got all excited because it reminded her of the sweater I recently made myself. The first time Caroline saw the sweater, she told me that I was welcome to make her one any time. I had knit the hat before completing the sweater, but I am thrilled that she loves it so much.

Happy Birthday, Caroline! Caroline is one of the biggest supporters of ChemKnits, so once again I ask you to consider sponsoring her as she prepares to run the Boston Marathon for the Museum of Science.

Sunday, February 5, 2012

Sticks, Hooks, and the Mobius: Knit and Crochet Go Cerebral

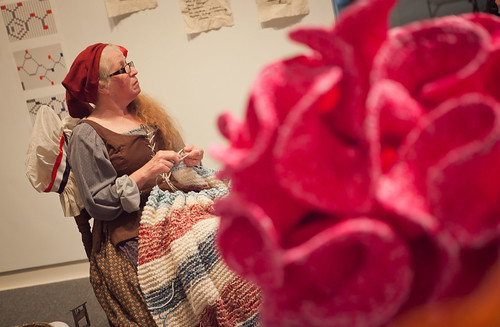
Today is the last day of the Sticks, Hooks, and the Mobius: Knit and Crochet Go Cerebral exhibit. The curator asked me last minute if I had any knit molecules to supplement my charts. I ran through my house looking for any I had already knit (Peptide Beer Cozy, Hangover Beer Cozy and Caffeine Coffee Cozy) and then added 5 more molecules. I'm not sure if these made it into the exhibit, but I'm hoping that they will be returned to me.


I am not sure if any of my knit samples made it into the exhibit, but in the two photos you can see my knitting charts on the wall in the background!

Photo Credit Lafayette Gallery

The curator is hoping to make an electronic version of the exhibit. I will keep you posted!

The molecules I knit have a 2 row and 2 stitch border. I am not writing an official pattern for these items, but the charts are all available here at www.chemknits.com.


I love knitting molecules. Have you used ChemKnits Molecule Knitting Charts in any of your own projects? Share the links!