Tuesday, February 28, 2017

Neurotransmitter Molecule Knitting Charts - Dopamine and Serotonin

I have designed many different molecule knitting charts over the years.  I love when I get requests to chart specific molecules because I know that these will turn into unique knit garments.  Recently some followers requested that I create charts for the neurotransmitters dopamine and serotonin.

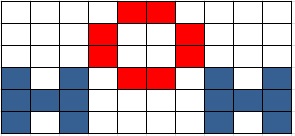
Dopamine Knitting Chart - 23 sts x 13 rows
All of the love to the Wellesley sibling who requested the dopamine knitting chart.  I hope that you are able to find someone to help you turn this into a hat for the March for Science.

Serotonin Knitting Chart - 27 sts x 18 rows
How can you incorporate these molecules into knitting projects?  You could put a bunch of molecules around the brim of a hat or headband.  You can either use stranded knitting or you could duplicate stitch the molecule onto your garment after the fact.

Do you have any molecule requests?  I can chart many molecules but the smaller the molecule the easier it will be to fit it onto a knit garment.  I have had some requests that are too complex for me to create, but I will do my best to help you out with your molecule knitting hopes and dreams.

Serotonin and Dopamine Molecule Knitting Charts © 2017 ChemKnits & Rebecca Roush Brown.  These charts are available for free via www.ChemKnits.com for your personal or charity use.  You are not to copy or distribute this pattern without the permission of the publisher, ChemKnits.

Monday, February 27, 2017

Aquacessories - H2O Molecule (aka Water Molecule) Knitting Charts

The "Ice Cap" Headband - Aquacessories with Water Molecule Knitting Charts

I like to design molecule knitting charts, and I've even knit many projects (mostly beer cozies) with them over the years.  Currently my most popular molecule chart is the DNA cable which can be seen in the GENEie Hat Collection.  Recently I was asked to design some H2O knitting charts.  Hydrogen is usually invisible in the molecule charts I design, so this presented a unique opportunity to think about the shapes a different way.

There is a lot of movement in water molecules so I designed a few versions.  I think that it would be really fun to have these molecules dance around the brim of a hat.  I had a lot of fun coming up with various "vibrations."

Ice Cap (Aquacessories Hat & Headband Knitting Pattern) - I recommend a gauge of 22 sts/4" and 12 rows/2" over colorwork stockinette using size 6 (4.0 mm) knitting needles and worsted weight yarn.  Since I have not knit a sample of this pattern please consider this more of a guideline for creating your Aquacessories.  If I get a chance to knit up a sample I'll update this page accordingly.
  • Using worsted weight yarn (in three colors), cast on 100 sts with the main color on US size 6 (4.0 mm) knitting needles.  Join to knit in the round. 
  • *K2, P2* around for 3 rounds (headband) or 5 rounds (hat).  
  • *K10, M1* around (110 sts).  
  • Next round: Join the contrasting colors and begin round 1 of the knitting chart.  You will repeat the chart 5 times in each round.
    22 sts x 9 rows
  • Continue knitting the remaining 8 rounds of the knitting chart.  Break the contrasting colors and continue either the hat or headband instructions. 
  • HEADBAND 
    • Knit across for 1 round
    • *K9, K2tog* around (100 sts)
    • Knit 2 rounds of 2x2 ribbing (*K2, P2* around)
    • Bind off in ribbing pattern.  Weave in loose ends and block if necessary.  
  • HAT 
    • Knit in stockinette (knit every stitch around) until the hat measures 6.5" from the cast on edge.  
    • Begin crown decreases as follows:
      • *K9, K2tog* around (100 sts) 
      • K around 
      • *K8, K2tog* around (90 sts) 
      • Continue to decrease stitches every other round until 10 stitches remain.  
      • K2tog around (5 sts) 
    • Break yarn and pull through remaining stitches with CC. Weave in loose ends. Block if desired.
When I realized how ordered these water molecules were arranged on the headband I had to rename it the "Ice Cap"! 

Here are some other water molecule knitting charts that you can incorporate into your favorite Aquacessory.

H2O Knitting Charts - Ball Version - For some "vibrations", rotate the chart 90, 180 or 270 degrees.

Water Version #1 - 11 sts x 9 row

H2O Knitting Charts - Molecular Formula Versions - There are more ways you could rotate these water molecule knitting charts beyond the three options I've shown below.  They can be flipped and rotated to try to fit them together in an array.  

Letter Version #1: 9 sts x 7 rows
Letter Version #2: 9 sts x 9 rows
Letter Version #3: 10 sts x 6 rows
 Incorporating Water Knitting Charts into Aquacessories Hats & Headbands
The March for Science is coming up on Earth Day - April 22, 2017.  A bunch of crafters are working to create a variety of hat styles in green and blue to show our support for evidence based legislation, climate change, and many other science issues.  (To read more about why I am marching check out the original GENEie hat knitting pattern.)  

I haven't knit any samples with these charts, but I have some idea about how you could incorporate it into a hat or a headband.


Water Water Everywhere Knitting Chart
The last chart is an example of how you might incorporate multiple H2O charts into one garment.  There are additional rotations beyond what I shared above.  If you were to cast on 100 stitches and knit this chart 5 times around you would have a very busy water hat (Aquacessories!)   Keith said that this chart looked a little like a "Ho, Ho, Ho!" Christmas hat, but I decided to share the busy water example anyway.  Do you see water or laughter in this chart?  

An example of how you can put a bunch of the letter water molecule knitting charts together.  This example is 20 sts x 34 rows.   

How would you use a H2O knitting chart?  Let me know in the comments!

Ice Cap, Aquacessories and H2O Molecule Knitting Charts © 2017 ChemKnits & Rebecca Roush Brown.  These charts are available for free via www.ChemKnits.com for your personal or charity use.  You are not to copy or distribute this pattern without the permission of the publisher, ChemKnits.

Thursday, February 23, 2017

Dyeing Pink Yarn for a Pussyhat with KoolAid and Food Coloring


As I was finishing up the design of the first 4 GENEie hat patterns, a good friend of mine asked for a DNA Pussyhat.  I was so excited to splice the design of these two hats together but I quickly ran into a problem.  I had no pink yarn.  My favorite shops were cleaned out of pink worsted weight yarns, too!  What was a knitter to do?  


I am ChemKnits, and I love to dye yarn.  My YouTube Channel (ChemKnits Tutorials) is filled with my dyeing experiments.  While I'm dyeing, I usually make things up as I go along.  I like to share my "oopsies" and things I could try to get different results.  I love that people enjoy my unfiltered, somewhat rambling, process.  I also love that I can get excited for a new dyeing project AND to share it with all of you.  


Normally I like to do my immersion dyeing (kettle dyeing) on the stovetop. This is the easiest way to control the temperature of the dyebath.  However, not everyone has access to a stove so I wanted to share some microwave dyeing.  


Materials and Methods

  • Materials: 100 g Bare Wool of the Andes Yarn (Worsted weight), 1 packet Pink Lemonade KoolAid, McCormick's NEON food coloring (Pink, 40 drops), Water, Microwave safe dish.
  • Presoak the yarn in cool water for 20-30 minutes
  • Starting with at least 4 cups of water, mix in the KoolAid and the food coloring drops.  
  • Add the presoaked yarn to the dye mixture, increase the volume of water so the yarn is completely submerged.  
  • Microwave the yarn in increments until the dyebath starts to boil.  With my setup this took ~15 minutes.
  • Allow the dyebath to cool.  If there is still dye in the water, you can heat the dyebath again to help the dye absorb to the fibers.  If the water is clear, proceed to washing.
  • Wash the yarn.  When the yarn is COMPLETELY COOL, wash it in lukewarm water and dishsoap to remove any excess dye.
  • Allow the yarn to dry an admire your pretty yarn!  


Kettle dyed yarn is so much fun.  It looks solid but when you look closer you can see subtle variations to the color.  The best part about dyeing with food coloring and KoolAid (besides the wonderful, fruity smell) is that this is all kitchen safe.  Everything I used for the dyeing process can be used on dishes that I eat from.  

The GENEie Pussyhat

Want to know more about the dyeing process?  Watch the video!

Monday, February 20, 2017

Happy Birthday, Keith!


Happy Birthday, Keith!  Happy Happy Birthday to YOU!  Keith's birthday always falls at the end of a long holiday season from December to the end of February we have my birthday, Chanukkah, Christmas, our non-wedding anniversary, Ryder's birthday, Valentine's Day and then Keith's birthday.  I frequently try to plan out all of these gift giving opportunities at the same time so it is hard for me to hold back gifts at Christmas time because I'm so excited for him to open them up.

This year I made Lucky's birthday shirt, I made Rowdy's birthday shirt (not yet published on ChemKnits), and I figured, why not make Keith a birthday shirt, too?


My original idea was just to put "33" on the front of the shirt.  But now this is a shirt that Keith can only wear one day.... ever.  (Technically he could wear it more days, but realistically I can't see him wearing it for more than 5 minutes.)  I could put "Birthday Boy" or "1984" on the front... but would Keith technically deserve a new shirt every year just like my other boys?  Even if this is mostly a gag gift, maybe I should stick to my original idea.


When I was shopping on Small Business Saturday, I found the coolest paper airplane fabric.  I knew that this would be the perfect choice to make Keith an epic birthday shirt.  This also meant that I didn't have to worry about creating something besides the number on the front of the shirt.

I thought I was going to put a large "33" on the front and a (slightly) smaller "DAD" on the back.  I could have done "DADDY" but I was afraid that the letters would be too narrow to really appreciate the fabric.  I printed out both sides so I could pick which one fit better.  In the end, I decided to go with Dad (less cutting and sewing PLUS more fabric for each letter.)


Selecting the fonts was easier this time.  I used the same font (Hobo Std) that I used in the applique name pillows I made the boys since I love how it turned out. The word "DAD" is size 350, "33" is 550 and "DADDY" is size 200.

I've now done a bunch of different applique projects so making this shirt feels like an piece of cake.  I traced the letters backwards onto some two sided applique interfacing and then cut out the letters and ironed them onto the shirt.


One one of my pieces of paper I had a 1"x5" box to help me scale items and I realized that I wasn't printing to scale, I think I might have been "sizing to fit" before I printed.  Ultimately this doesn't matter for this project but I need to pay attention when I'm printing out pattern pieces.


I used the settings 8, 2.0, 0.4 for my zig zag stitch.  This was slightly more open than I've done on other projects lately. I like that it is a bit open and that it looks almost like the lined paper the planes are made out of.  I would go with 0.3/2 distance in the future.  I especially was nervous because this is the same thread combo that gave me issues on my Wellesley pillow.  I had no issues with the applique!


This project whipped up so fast!  I'm really getting the hang of appliqueing things onto shirts.  I may need to find some better fusible web since that seems to become undone in the wash (I haven't washed this shirt yet, but my only ironed, not stitched Wellesley Tshirt W's came off and my red bird was a little wrinkled until I ironed it again.)


I can't wait to see Keith's face when he opens up this present! I'm not sure if he'll let me share a picture of him wearing the shirt with you, but I'll try to post an update if he gives permission.  


Now I need to start thinking about Indy's birthday shirt...  Thankfully I have until June to make this work!

Project started and completed 12/20/2016

Monday, February 13, 2017

Breaking Speckled Wilton's Violet on Roving


Let's break some more Wilton's Violet food coloring!  Previously I've explored making various long gradients with Wilton's violet but now I want to see about breaking tiny patches of color.  I think that most of the fiber I dye involves breaking Wilton's violet.  It is so fun to watch the colors separate and then it spins up into a fabulous yarn.


I tried to combine both of my speckling techniques here (dabbing with a fork and adding drops with an eye dropper).  Ultimately I liked adding single drops with the medicine dropper more than dabbing with the fork on roving.

Right after I finished applying the dye
After sitting for a little while - look how the dye separated!  

I let the fiber sit for longer than I meant to before steaming it because Lucky came home from the playground with Grandmama and you wouldn't be able to hear me over the sounds of them playing.  Look how much the dye moved already! There might be less separation if I put the fiber directly into the steamer.


When I added the fiber to the steamer, I accidentally let one edge dip into the water.  I recovered quickly but I'm not sure how much was submerged in the simmering bath.  In the end there was a lot of blue in the bath, but I'm not sure if the dye was dripping down during steaming or if this is just from the quick dip.


The colors split so much more than in the speckled yarn I created earlier that afternoon.  Watch the video to check out the fun transformation.  


Materials and Methods
  • 100 g BARE wota roving LINK
  • I presoaked the roving in 16 c water (room temperature) with 3 T white vinegar for 1 hour.  I squeezed out most of the water so the yarn was wet but not dripping.
  • The Dye -  I started with what remained from the 1/8 tsp Wilton's Violet food coloring LINK in 1 T water in the speckled wilton's violet yarn video.  I added 1 T water to the remaining dye and then mixed 1/8 food coloring + 2 T of water for the remaining dye.  
  • I applied the food coloring to the fiber with a medicine dropper and by dabbing with a fork.  I turned the fiber over in the middle of the application to get the coverage I wanted.  
  • Waiting to let the dye spread (by necessity since Lucky came home and it was too noisy for me to film!)
  • Steam the fiber over boiling water for 30 minutes.  I added a dash of salt to the steam bath.
  • After the fiber has cooled, wash with dish soap until the water runs clear and hang the yarn to dry.  

Look how clearly you can see the pink dots.  They are so well defined compared to the streaks of blue.  This is because the red dye binds to the fiber faster than the blue food coloring molecules, and the blue travels further creating bigger patches of color.


The dye broke so much here that there almost isn't any purple, it is all pink and blue!


I don't want all of my spinning videos to involve broken violet fiber, but this fiber is so fun that I know it is moving to the top of the queue.  


As we start a new year, I can't help reflecting on how far I've come as a fiber artist since I created ChemKnits.  When I started this blog I never dreamed that I would be dyeing and spinning, much less sharing my process with thousands on YouTube!


It makes me so happy when you share pictures of your dyeing projects with me on Instagram and Facebook.  Don't be nervous to start trying.  Some of my favorite yarns and from "mistakes" that I made along the way.  Continue to share pictures with me and ask me questions, you all inspire me so much!

Sunday, February 12, 2017

The GENEie Collection of DNA Beanie Hats

The updated (3.9.2017) GENEie Collection designed by ChemKnits in support of the March for Science:
GENEie Next Generations Headband and Hat (Colorwork - bottom left and right)
My name is Rebecca Roush Brown and I am the designer of ChemKnits.  I never imagined that when I was asked to design a DNA hat in support for the March for Science (April 22, 2017 - Earth Day) that I would end up with 5 different DNA hats.  Thank you all for the amazing response to the GENEie DNA Beanie collection.  In this post I will summarize the 5 designs and share some other amazing free science hat knitting patterns.  

The GENEie Collection (minus the GENEie Plasmid Headband)
I designed a DNA helix cable years ago to a make a Kindle Cover for my Chemist father.  This wasn't my first science design, but it was this cable that caught people's eye.  This is the reason why a few different knitters separately reached out to me to create a design for the March for Science.  The first hat that I knit, however, was the Colorwork version of GENEie.   This is the warmest hat in the collection and may not be the most appropriate for an April march.  It would be much cooler done in cotton or cotton blends.  

GENEie (Colorwork Version) - Modeled on my 22" head.
I didn't cast on the cable version of GENEie right away because I wanted to make sure I could do justice with the spacing and decreases on the crown.  I wanted the design to shrink into the top so it looked like you were looking along the length of a double helix.  Even knit with wool yarn, this hat is pretty light and airy.  It is a great option for the April March for Science if you live in a cooler area.  (Boston can either be cold and raw in April or super hot.)  

GENEie (Cable Version) - Modeled on my 22" head.
I started designing the first two GENEies before the date for the march was announced.  As soon as I realized that it was going to be towards the end of April, I started thinking of hat versions that would work for warmer weather.  Before I knew it the DNA helix had flipped and I was knitting GENEie - The Next Generations. (In retrospect I wish I had named these the GENEie Plasmids!)   The rotated colorwork cable is slightly different than the one in the original colorwork GENEie. There are four different patterns in Next Generations: a headband and a hat version that both come in Adult L and Toddler sizes.  The adult headband sample is knit in a cotton blend and that worked FANTASTIC.  This is the best option if you want to knit a head accessory but are concerned about the warmth in April.  

GENEie - The Next Generations Headband - Modeled by Keith (23.5" head)
GENEie - The Next Generations Hat (Toddler) - "Rowdy" is 1 year old and has an 18.5" head.
On the suggestion of a dear friend, I designed the GENEie Pussyhat.  All of the stores near me were out of pink yarn so I dyed my own with KoolAid and food coloring.  (Dyeing yarn is a huge passion of mine.  I have a YouTube channel dedicated to Dyeing Experiments!)  Through this hat I wish to show my support for the March for Science and the Women's March.  

The GENEie Pussyhat - Modeled by my 22" head

Finally, I'm pleased to introduce the 6th evolution of the GENEie collection... The GENEie Plasmid Headband! (Published March 9, 2017) Now there is a GENEie designed to knit flat with both line-by-line written instructions and a full chart.  Of all of the GENEie designs, this is one where gauge and yarn weight truly don't matter.  Cast on and knit until the headband is long enough and then sew the ends together. You could end up with a much wider headband or a really thin headband, but this is much easier to adapt than some of the other patterns.

GENEie Plasmid - A DNA Cable Headband Knitting Pattern

I thought the GENEies were done evolving... but then I created Spliced!  Spliced is a crochet chain appliqued onto a crochet headband base.  The base pairs are embroidered with a backstitch.  The best party of Spliced is that you can create this design on many different backdrops; knit, crochet, or woven!  

Spliced - A Crochet Chain Applique GENEie Headband

Why do I march? I believe in peer review.  I believe in evidence based legislation.  I believe that  scientific data funded by tax dollars should be available to the public.  I believe in outreach programs so the general public can understand what results mean.  I believe that you cannot ignore data just because it doesn't support your hypothesis.  I believe that by standing up and speaking loudly that we can make a difference. This is why I march.  This is why I designed the GENEies.

The GENEie DNA Knit Motifs

Free Science Hat Knitting Patterns

A long time ago, I did some research looking for science knitting patterns and DNA knitting patterns. Unfortunately, some of these links are no longer valid.  In an effort to support the March for Science with a lot of epic science hat, here are some of my favorite free science hat knitting patterns:
  • Brain Hats - There are three versions of Brain Hat Knitting patterns on Ravelry, and it isn't immediately clear to me which design was created first... but all of the designs are darling.  What these hats have in common is that a series of icords to create the crevices on the brain on top of a beanie hat.  
  • Science Matters Hat - The Science Matters hat is a free knitting pattern designed specifically for the March for Science.  Knit with concentric rings textured of blue and green (some colors are K around, the alternating ones are purled), this hat subtly represents our planet.  This design is perfect for knitters who might be intimated by stranded colorwork or cables, all of the color changes on this hat are stripes.  
  • Heterocycle Hat - This is a fun hat with colorwork molecules (specifically heterocyclic molecules) around the brim.  When I started designing my own molecule knitting charts I initially avoided molecules audreym used in this design.  The pattern is available as a free Ravelry download.  If you aren't comfortable with colorwork, you could always embroider a molecule with duplicate stitching to any basic knit (or crochet) hat.  
  • Trilobite - Cables and bobbles create the outline of the trilobite fossil around the brim of a beanie hat.  The designer was living with a paleontologist when she realized that creating a trilobite in relief would be an awesome cable project.  
  • Chromosome Cap - This is a hat after my own heart.  If you are new to cables this might be the hat for you.  This hat has chromosomes going around the edge.  If you are new to cables there are way fewer cable stitches than in my Cable GENEie hat.  (The wrap stitch might be a little complicated but I think it is well explained.)  This hat might be a better choice than the GENEie if you are attempting cables for the first time.  
  • Central Dogma Hat (DNA - RNA - Protein - This colorwork hat designed by Melini Melini is stunning, especially when constructed with two colors.  I love that you can see the progression from the brim (DNA) to the crown (protein).  The hat calls for sport weight yarn to accommodate the complex colorwork design.  This pattern is available for free Ravelry download.  
  • DNA Hat - Do you want a DNA hat with a DNA cable running around the brim?  Well then this hat is for you!  The cable is worked flat, grafted together and then stitches are picked up around one edge to complete the crown of the hat.  
  • Earth in Space Hat - This is a simple crochet beanie but what makes it special is the amazing planet earth pompom on top of the hat.  The pattern contains instructions so you can make your own Earth pompom.  This is something that non-knitters should be able to do, too. You could add the pompom onto anything, a sewn hat, a crochet hat, or something that isn't even a hat at all. There are photos to illustrate how you should wind the colors onto the pompom maker.  I cannot wait to try this pompom myself!  
  • Brain Waves Beanie (CROCHET!) - This hat isn't overtly science, but it is a very popular crochet hat that has bands of color in waves.  I don't think that someone looking at it would immediately know that it was a science hat, but it is beginner friendly.  Maybe you should add an Earth in Space pompom on top.  This pattern is available as a free Ravelry download.  
  • Resistor Hat - This is another science knitting pattern designed specifically for the March for Science.  This hat is a lovely way to show your resistance (the pun title is indented.)  The designer is a microbiologist from Stanford university.  This is a perfect hat for many people, but especially those who are in the physical sciences.  
  • Math Geek Hat - Pi = 3.14159265...  A colorwork chart to go around the brim of the hat.
  • DNA Scarf by June Oshiro - This isn't a hat, but given that my popularity right now is based on DNA helix cables I wanted to give a shout out to this classic DNA scarf.  The DNA hat above uses the DNA chart from this pattern.  
  • Binary - This is a scarf pattern filled with 0's and 1's.  While the design itself is of a scarf, I think that the 0's and 1's would look amazing on a hat for the march, too.  
If you are a beginner knitter (or crocheter) and want something simpler... knit any hat in a shade of green.   People are planning to express their love for science through their attire in a variety of ways.  Some people are tie dyeing lab coats, others are purchasing official March for Science attire.   Some people will wear the pink Pussyhats that are a symbol of resistance.  Many people will carry signs.  I plan to wear a hat (Boston can be pretty raw in the springtime) but if it is too warm then I will come up with something else. 

If April 22 is going to be too warm where you live to wear hats for the March for Science, you can still create hats to show that you are a Science Fan.  I guarantee that science lovers in your life will light up when they see one of these hats.  

GENEie - The Next Generations Hat and Headband - My head is 22" and "Rowdy's" head is 18.5"
I'm wearing the original GENEie (Colorwork version) and Rowdy is wearing GENEie - the Next Generations

The first 5 patterns of the  GENEie Collection designed by ChemKnits in support of the March for Science:
GENEie (Colorwork Version)
GENEie (Cable Version)
GENEie Next Generations Headband and Hat
GENEie Pussyhat

If you need any help with any of the GENEies, make sure you check out the following playlist:


I have no official affiliation with the March for Science. I am a Biochemistry PhD who knits and wants to share some designs that can be used to support the cause.