Thursday, December 10, 2009

Charts for you Pain Relief

My other molecule knitting charts have been very popular, so I've decided to expand with some other famous molecules. In the Hangover Beer Cozy by ChemKnits, I provided you with a chart of ibuprofen for the "recovery" side of the cozy. Here are some other molecules that are known to provide "pain relief" that could make a fun addition to your beer cozy.


Aspirin Knitting Chart (20x20)


Methamphetamine Knitting Chart (13x22)


Acetaminophen Knitting Chart (13x23)

Molecules like Hydrocodone and Morphine cannot be drawn flat, so unfortunately I cannot provide you a chart at this time. Maybe I you could crochet out the extra cycle.... something to think about!

This this pattern was created by ChemKnits for your personal or charity use. This pattern is not to be replicated, sold or redistributed without permission from ChemKnits. © 2009 ChemKnits

(For other molecule knitting charts by ChemKnits checkout the 20 (natural) amino acids, generic pentapeptide chart, and Molecule Charts I: containing some amino acids, glucose, THC - tetrahydrocannabinol, and capsaicin.) © 2009 ChemKnits

Monday, December 7, 2009

Knit Beaded Christmas Ornament Pattern

After finding this pattern for beaded Christmas ornaments, I was inspired to design my own based on items that I could easily find. I was also hoping to take advantage of the plethora of fingering weight wool I have around my house. Another advantage is that by using large beads (rather than tiny seed beads), I won't have to string as many onto the yarn!

For tips about how to make beaded knitting projects, check out this knitty article.

Materials:

  • Knitpicks Palette Blue Note Heather (blue with hints of teal and pink)
  • Aqua Purple lined (LT6E62) 6/0 Czech glass beads (24 g tube)
  • Wire Beading Needles
  • Yarn needle for finishing
  • 2.5 inch Styrofoam Ball
  • Size 3 (3.25 mm) double pointed knitting needles.
Gauge: ~9 sts/inch; ~8 rows/inch

First string the beads onto the wool. I strung the entire package onto the wool, but I did not need that many beads for my ornament. Since I do not have a crochet hook small enough to add beads onto the work as I go, it was better to have too many beads strung than not enough.

The Pear-Shaped Beaded Ornament Pattern
Row 1: Cast on 6 sts. Join and knit 1 round.
Row 2: Kfb across (12 sts)
Row 3: Kfb across (24 sts)
Row 4: K1, slip 1 bead (s1b), *K2, s1b* repeat from * until the last stitch, K1. (12 beads)
Row 5: kfb across (48 sts)
Row 6: Repeat row 4 (24 beads)
Row 7: *K1, Kfb* across (72 sts)
Row 8: Repeat row 4 (36 beads)
Row 9: *K2, kfb* across (96 sts)
Row 10: Repeat row 4 (48 beads)
Row 11: K across
Row 12: *K2, s1b* across (48 beads)
Row 13: *K2, K2tog* across (72 sts)
Row 14: Repeat row 4 (36 beads)
Row 15: *K1, K2tog* across (48 sts)
Row 16: Repeat row 4 (24 beads)
Row 17: K2tog across (24 sts)
Row 18: Repeat row 4 (12 beads)
At this point, place your styrofoam ball into the knit sphere. You will need to stretch the knitting out to get it to fit close to the top of the ball. It may be helpful to have toothpicks to anchor the knitting around the ball. We will now be starting the section that will appear more lace-like. When you knit the following rows, pull the stitches tight so you can close the casing around the ball. If you are having difficulty getting the needle in the stitches, increase the number of dpn you're using.
Row 19: k across
Row 20: *K2, S1b* across (12 beads)
Row 21: k across
Row 22: K2tog across (12 sts)
Row 23: K2tog across (6 sts)

Cut yarn, pull though remaining stitches. Weave in loose ends. Using yarn or thread, tie a loop at the top so you can hang it on your tree. Step back and admire your work. Then take a picture and send it to me at ChemKnitsBlog@gmail.com.


Before stretching the ornament, it looks small on the styrofoam ball.

Total beads used: 254
Total beads remaining on wool: 145

I accidentally ended up creating a pear shaped ornament. In theory, I could have stretched it over the ball completely, but it was so hard to knit around the Styrofoam ball that I added some rows at the top. They are stretched more, and have a lace-like effect that I found pleasing. I was also concerned about running out of beads, but as you can see I only used about 2/3 of the container.

I also learned that the beads are more visible on the WS of this project (I regret that I do not have a photo of this for you). I liked the subtle aspect, but if you want to beads to be sticking out more like dew drops, then change all K's to P's.


My tree, with my beaded ornament and knit snowbuddy.
The beaded ornament is a similar size to glass bobbles you may already own.

---------------------------------------
Abbreviations used in this pattern:
Kfb - increase by knitting into the front and back of a single stitch.
s1b - slip one bead
K - knit
P - purl
K2tog - decrease by knitting two stitches together

This this pattern was created by ChemKnits for your personal or charity use. This pattern is not to be replicated, sold or redistributed without permission from ChemKnits. © 2009 ChemKnits

Saturday, December 5, 2009

Search for Custom Spinners

I love dyeing my own yarn for knitting projects, but there are limits to the colorways I can achieve. I would love to dye wool and spin it into yarn, but realistically it would take me far too long to learn to be able to make such a project from start to finish. (Hours on the hand spindle resulted in maybe 2 yards of super chunky wool.) Although I am still considering lessons on a spinning wheel, I'm now researching places that will custom spin yarn for you.

Most of the wool processors I've found are for people who want to process their raw wool from sheep. I want someone who will take roving that I've dyed myself and turn it into yarn (see this knitty article). Why not just buy handspun yarn from esty? I want to have a role in the colorway, and design the yarn I want for a (yet unknown) project.

Preliminary research indicated that I want handspinning, not a mill. I want character with color, I don't care about the handspun feel, but there are problems with mills. 1) Many require more pounds, 25-50 lbs, of wool than I would ever want for a single project. 2) One mill with low weight requirements indicated that when they put the wool through their carding machines (which they always do), the handpainted effects will be lost.
  • Joy of Handspinning - Maximum 5 lbs fiber, 2 ply is 2.45/ ounce. They accept many fiber types (including dog!) This may be my best bet.
  • Big Sky Quality Wool - $22/pound for spinning from roving, add $2 (per pound?) for lots under 5 lbs. Other mills I've contacted will machine card the wool you send them, so handpainting roving would not really work. It is worth contacting them to inquire if they accept handpainted rovings.
  • Bel Tine Farm (formerly Blue Moon Farm) - No minimum. They only do spinning, no other fiber processing. Around $20/lb.
  • Carother's Country Farm - Around 22/lb. no minimum. They will also do custom hand spinning.
  • VIP Fibers - Turn dog or cat fur into yarn... I think that would be difficult for people with allergies!
  • Alpaca Nation - $3-5 per ounce for custom handspinning. they take roving.
  • Esty Alchemy - I could post my own ad for spinners! It would not be difficult to see examples of other people's work. Upside - ratings from dealings with other people. Downside - since it is likely not an established company, there is less trust. Upside 2 - I could name my price and see if it is reasonable.
This is not technically a pattern search, but I figure that there are other knitters out there with the same inquiries as myself. And now I have something else to save up for...

Do you have any advice? I'd appreciate it!

Monday, November 30, 2009

Tea Dyed

I love dyeing yarn with things that I've found in my kitchen. I have had great success with Kool-Aid and vinegar and food coloring. The colors tend to be very saturated and vibrant, so I wanted to play with methods of making more muted colors.

Brown:

I know that you can stain paper and fabric with tea, so I decided to give it a try with my undyed wool.
I allowed 1 tea bag to seep in 1 cup of boiling water (with 1T white vinegar) for about 1 min. I removed the tea bag and added pre-soaked undyed wool. When I achieved a light brown, I transferred the wool to some luke warm color, but a fair amount of color leaked out (although the yarn was still definitely tan). I added more vinegar and microwaved the mixture on high for 1 min. The color did not get any darker...

Green ("Green Tea"):

I added 2 drops of green food coloring to some of the remaining tea/vinegar/water mixture.

Unlike my previous dyeing experiences, the dye in the water did not completely absorb to the yarn. A large amount of green remained in the water, even after multiple microwave and cool cycles. The only assumption I can make is that the yarn became saturated with the remaining tea in the water, and could not absorb any more color. (I'd like to point out that in my Dinky Dyeing extravaganza, I used 12 drops of green with a similar amount of yarn, and all of the color got absorbed.) Since I had achieved the color that I desired, I did not worry too much.

Pink:

Warm tea/vinegar mixture + 1 drop red food coloring. Since I wanted a pale pink (think pig colored), I did not allow the yarn to soak in the colored water for long, but would dip and remove until I achieved the color I desired. The dye water was still pink, but the pink in the wool stayed!

Experimental handpainting:
1 skein was dipped in cooled-left over pink water (to get some vinegar), placed on the plastic work area and painted with 4 drops of blue and 4 drops of green food coloring. The remaining pink water was brought to a boil, and the skein was dipped into the boiling water.

I was prepared to loose the variegation. I let it boil for about 30 seconds, and saw that most of the dye bled out (which was not unexpected). I was not prepared for the yarn to remain so muted with 8 drops of food coloring! I let the yarn sit in the boiling dye mix for longer, and the color would not completely absorb! I blame the tea. I'm so excited that I've found a way to play with color, but to achieve paler colors! I even still have some variegation:


In Contrast...
For comparisons sake... I did some primary colors at the same time (just vinegar and some food coloring. 4 drops blue, 2 drops green and 2 drops red total. I microwaved the skein for 1 min, and let the wool cool before washing in luke warm water with mild soap. See how vibrant?


Tea Conclusions
Using tea water helps keep the colors muted. Whether it is a change in ph (doubtful) or just the compounds in the tea limit the ability of wool to absorb colors, I do not know. I was, however, successful in achieving the colors that I desired. This was the first time that I did not see full or mostly absorption of the color into the wool. I could have used a LOT more wool with this dye amount....


(After the fact, I found this article on tea dyeing if you would like to do more reading on the subject.)

Thursday, November 26, 2009

From Fleece to Yarn

These books discuss more about the spinning process and what to do with your yarn once you're done.

A Fine Fleece: Knitting with Handspun Yarns by Lisa Lloyd

The patterns in this book are separated into three categories: Light and Shadow (Studies in Contrasts), The Forest and the Trees (Scale and Perspective) and Conceptual Stitches & Emotive design.

The designs are very classic, and to quote the forward author Clara Parkes, the book contains "26 patterns that were conceived from the very start for handspun yarns." Every piece is shown in handspun and commercially available yarn.

There is little in this book about how to spin, so it is not a book to use to learn that craft. (There are some details about caring for your yarn, gauge, different breeds of sheep, and other concerns when you are dealing with a non commercial yarn.) It may, however, help answer the question... so I've spun this yarn... and now what?

Many of the pattens are sweaters, and they are pretty loose fitting, and some are even unisex. (The patterns are beautiful, but they are not my style and similar types of cabled sweaters etc can be found on the internet.) These are projects that would be for an accomplished spinner, as you would need yards and yards of yarn to complete something. Not all of the pictures have both the handspun and commercial yarns in focus, so the comparison is difficult. For some projects, it is clear which garment was handspun (before reading the caption), but for others it is difficult to tell.

In conclusion, I am neither completely satisfied with this book as a spinning book or as a book of knitting patterns.


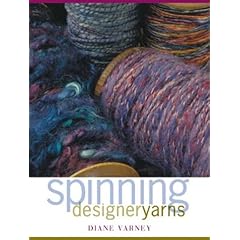
Spinning Designer Yarns by Diane Varney

There is a nice intro section discussing important things for spinning yarn (troubleshooting, measuring yarn thickness, to ply or not to ply etc.) Then (to my joy) there is a section on dyeing raw fiber, and how to deal with color while spinning. Color blending... I want to blend colors!

There are sections talking about the different kinds of yarn you can spin, such as adding slubs in on purpose (at this point with my hand spinning, I'd be happy for no slubs, thank you very much! I can certainly understand the appeal, however, of creating a yarn that looks very handmade.)

The book is mostly in black and white. I would have loved more photos, but as a reference it is one of the best I've seen thus far. I have not yet seen in a book descriptions on how to create so many different types of yarn. I think this would be helpful once I've mastered the basic spinning techniques, so I may be picking this up for myself someday!

Sunday, November 22, 2009

Hangover Beer Cozy Pattern

In thinking about the biochemistry of inebriation (and subsequent dehydration and hangover), I thought that it would be funny to incorporate these molecules into charts. How often do you stop and think what you're doing to your body when you're drinking? I therefore present to you the "Hangover" Beer Cozy. This cozy has a scheme of the ethanol metabolism pathway on one side (the inebriated side) and the structure of ibuprofen on the other (the recovery side).

Materials Required
  • Miscellaneous remnants of machine washable worsted weight yarn.
  • size 3 double pointed needles (I like a tight gauge on my cozies)
  • Gauge: ~ 12 sts/2 inches; 17 rows/ 2 inches (The gauge is not critical as long as the cozy will fit around the beer bottle you care about.)
  • A beer bottle to check the desired height
"Hangover" Beer Cozy Pattern
  • Cast on 45 sts in the main color (this will be the top of the cozy)
  • Work in (k2, p1) rib for two rows
  • Knit 1 row even in MC
  • Work the 42 rows of the chart, starting at the bottom, working right to left.
  • K 1 round even
  • *K7, K2tog*, repeat 5 times across. (40 sts)
  • K1 round even
  • K1, *K1, K2tog* Repeat from * 13 times (27 sts)
  • K1 round even
  • K2tog across until the last stitch, K1 (14 sts)
  • K2tog across (7 sts)
  • Cut yarn, pull through remaining stitches and weave in loose ends.
  • Put the cozy on a beer bottle and admire.

"Hangover" Cozy Chart to create a beer cozy with the ibuprofen structure on one side and the ethanol metabolism pathway on the other.


My heptapeptide beer cozy chart was 32x33, versus this 42x45 chart. They both seem to fit onto bottles very nicely.

Bonus:
Incorporate the ethanol degradation pathway or the ibuprofen charts into your own


Ibuprofen knitting chart. Dimensions: 15 x 29


Alcohol metabolism Knitting Chart. Dimensions: 10 x 42.

I hope that you've enjoyed my molecule knitting charts. Keep an eye out for more to come!

This this pattern was created by ChemKnits for your personal or charity use. This pattern is not to be replicated, sold or redistributed without permission from ChemKnits. © 2009 ChemKnits

Thursday, November 19, 2009

Bzzzzzzz: A Knit Bumble Bee!

As a kid, one of my Aunts would add "bee" to the end of names (I was Becca-Bee, she in return was Sue-Sue-Bee...) With this memory in mind, I have designed for you a cute little bumble bee!

Materials
  • Knitting Needles: 4 dpn Size 1, (2.5 mm)
  • Yarn: Remnants of KnitPicks Palette Yarn (Fingering weight) in Black, White and Bare (dyed yellow by me, see below).
  • Gauge: Not important for the completed project, but you want to knit tight enough that you will not see the polyester stuffing.
  • Misc: Toy stuffing, yarn needle.
  • Finished Size: 2.25 inch nose to stinger, 1.5 inch wingspan.

Body Construction:
(Starting at the tip of the head.)
1. CO 6 sts in Black. Join to knit in the round and knit one row.
2. Kfb across - 12 sts
3. K across
4. Kfb across - 24 sts
5. K across
6. K across
7. *K6, K2tog* repeat 3 times - 21 sts
8. K across
9. K2, K2tog, K5, K2tog, K5, K2tog, K3 - 18 sts
10. K across
11. *K1, K2tog* across- 12 sts
12. K across
Now starting the body of the fly.
13. Switch to Yellow: Kfb across - 24 sts
14. K across
15. K1, Kfb, K8, Kfb, K2, Kfb, K8, kfb, K1 - 28 sts
16. K across
17. Switch to Black: K1, Kfb, K10, Kfb, K2, Kfb, K10, kfb, K1 - 32 sts
Rows 18-20. K across
21. Switch to Yellow: K1, K2tog, K10, K2tog, K2, K2tog, K10, K2tog, K1 - 28 sts
22. K across
23. K1, K2tog, K8, K2tog, K2, K2tog, K8, K2tog, K1 - 24 sts
24. K across
25. Switch to Black:*K2, K2tog* across, 18 sts
26. K across
27. *K1, K2tog* across, 12 sts
Stuff the head and body with polyester stuffing.
28. K2tog across, 6 sts
29. K2tog across, 3 sts
30. work as Icord 1 round (to make the stinger), pull yarn through remaining stitches and weave in loose ends

For an alternate striping pattern (no pictured): If you would like to try a yellow head and 5 stripes on the body, try Rows 1-12 Yellow, 13-15 Black, 16-18 yellow, 19-21 Black, 22-24 Yellow, 25-30 black.


Wings (make 2):CO 4 sts. Work in Icord for 15 rounds and stitch caston to castoff edges, forming a loop. Sew the two wings in a bow type configuration at the neck of the bee body.

Dyeing the Yellow:
As described in some of my small scale dyeing tales, this yellow dyebath had 1C water, 1T white vinegar and 2 drops of yellow food coloring. The pre-soaked yarn was placed in the dyebath, and the mixture was microwaved on high for one minute and then allowed to cool until all dye was absorbed. The wool was washed in luke warm water with mild soap and allowed to air dry.


I considered making antennas or eyes for this little bee, but I preferred the almost cartoon-like simplicity of the body and wings. If you would like to add a simple Icord eye, see the plushie fly pattern by Chemknits.


---------------------------------------
Abbreviations Used in this pattern:
Kfb - increase by knitting into the front and back of a single stitch.
K - knit
P - purl
SSK - decrease by slipping two stitches then knitting them together. Alternatively, you could slip one stitch, knit one stitch and pass slipped stitch over.
K2tog - decrease by knitting two stitches together.

This this pattern was created by ChemKnits for your personal or charity use. This pattern is not to be replicated, sold or redistributed without permission from ChemKnits. © 2009 ChemKnits