Friday, January 28, 2011

Simple Knits for Sophisticated Living

Simple Knits for Sophisticated Living: Quick-Knit Projects from Beautiful, Chunky Yarns by Barbara Albright

I really like the organization of this book. The six chapters separate the categories of their patterns very nicely:
  • Cozy, Comfy Home (pillows etc) - 7
  • Kitchen Knitting (cozies, table runners, place mats, pot holders) - 4
  • Holding it together (purses, backpacks, etc) - 7
  • Knits for kids (sweater, hat, throw, toys) - 5
  • Simple Wearables, Sophisticated Threads (scarf, sweater, vest, slippers, shawl) - 5
  • Under Cover (blankets) - 5
The "how to" instructions are very straight forwards, with clear images to help teach the technique. (If someone is going to bother to give instructions, then they HAVE to show some kind of picture.)

Albright includes some really interesting details in her patterns. I really like the beaded, knit napkin ring. Some of the embellishing buttons really make the patterns look extraordinary. There are some items that are quite unique, I have never seen a pattern for a hanger cover before. Of course, as an avid toy knitter, I ADORE the knitted mice, who look like they could have been needle felted. I like the idea of a picnic blanket with a checkerboard in the middle, and handmade checkers, but I don't think that the concept is new.

Overall, the book is well laid out, and has really nice images. None of the patterns tempt me enough to want to make them, but flipping through this book has giving me inspiration for some other patterns. Therefore, I consider this library trip a success.

Sunday, January 23, 2011

A Sample of Intarsia Knitting (Video)

Intarsia is a form of colorwork knitting where you are only holding one strand (a single color) of yarn at a time. I created this video for my sister-in-law-to-be to help her out with a knitting project. Some notes on the video quality: At one point my knitting goes above the camera, but I promise that I come back into frame! The video is a little blurrier than I would like, but I wanted to finish it fast so I could send aid across the Atlantic.


Video: A Sample of Intarsia Knitting


Tuesday, January 18, 2011

How to Felt by Hand with a Bucket (Video)

Well I did it! I finally made some oven mitts and held off on felting them until I could make a video! I hope that you enjoy this tutorial on how to felt by hand with a bucket.


I have also put an extended version of the video on youtube. It is almost three times as long, and contains extra footage of me felting the oven mitts and a lot more talking by me! I doubt anyone would want to see the extended version, but someone may be interested to see a some more images of intermediately felted items.

Monday, January 17, 2011

More Oven Mitts


I love this oven mitt pattern. I'm also using some of the yarn that I hand dyed for the Housewarming Oven Mitts. When using up my stash of Knitpicks Wool of the Andes yarn, I don't have enough yarn to make a mitt in a single color, so I tried to make some interesting striping patterns to decrease my stash.

To calculate with the pattern this time, I made some notes on the rows between each step:
  • Increases for the thumb begin at row 32.
  • The thumb is tied off after row 51 (during the knitting of row 52)
  • Decreases for the top start after row 72.
  • There are 93 rounds total to this pattern. (After row 91, 12 sts remain).
These steps should help me plan out striping patterns in the future, and help me with placements should I start to try some intarsia.


The rainbow of remnants used for these mitts.


The rainbow shown in the previous photo was used for the mitt on the left. The mitt on the right had a much more random striping pattern. I cannot wait to see how they'll felt!

Thursday, January 13, 2011

Itsy Bitsy Holiday Sweaters - Part 1


Berroco has had three seasons of minutia sweater patterns, and these are some of the first they designed (from 2007 I believe). This winter, I knit a bunch of tiny sweater ornaments, and I decided to split it up into multiple posts so you could appreciate how fun each mini sweater is!

I used size 1 (2.5 mm) knitting needles and KnitPicks Palette Yarn that I hand dyed (with the exception of the black).

The first sweater I made was pattern #7. The colorwork in this sweater was a lot of fun. I used some of the yarn from one of my first time dyeing with 100% wool. You knit up one side of the body and then back down the other.


The Complete Body of #7

The directions involve knitting everything flat, and then there is a lot of seaming. I chose to knit the arms in the round, since there was nothing in the pattern that required it be knit flat. This saved me from seaming on the itsy bitsy arms.


After you connect the arms to the body (left), you pick up stitches around the neck and make the neckband (right).


The second sweater I knit was pattern #6. I used a brown that I created while dyeing for my knit hedgehog. This sweater was knit as one complete piece (except for the turtleneck) and then seamed up the sizes and underarms.


When I was adding stitches to make the arms, I cast on the additional stitches at the end of the row so then I could turn and work the stitches on the next row. This meant that there was no need to disconnect the yarn or have large floats to begin the arms.


The cable runs up one side of the sweater, and down the other side. You can pick which way you like the best!

I am knitting these sweaters on smaller needles and with thinner yarn than directed, so when directions state to knit for ## inches, I have to adapt it so it will look proportional. The cable pattern was worked 2 times, and the stitches for the arms were added after row 4 and row 5 in the third repeat. The neck shaping started just before row 6 on the fourth cable repeat. On the back side of the sweater, the arms were bound off during row 5 and during row 6. After the fourth cable round was completed, I bound off on the wrong side of the fabric.


This turtleneck was knit in seed stitch, and then folded over. I would wear this sweater if it were my size!

I love making projects that involve working with hand dyed yarn, you should check out this new article that I wrote! I hope that you enjoyed my first installment of itsy bitsy holiday sweaters. Someday I'll have to get back to making the full thing!

Tuesday, January 11, 2011

How to Make a Long Tail Cast On (Video)

The long tail cast-on method was the first that I learned when I was 10. It is still my go-to cast on method.

Video: How to Make a Long Tail Cast On - From slip knot to the end of the cast on stitches.


The Key Points:
  1. Start with a slip knot on your needle, making sure that you have a long piece of yarn (the "long tail") on one side. Pull it tight, but not too tight that it would slide around on the needle.
  2. Let the two pieces of yarn from the knot hang down. Pinch your left hand thumb and pointer finger, and go between the two strands. Open your fingers, and wrap the last three fingers around the yarn to hold it in place.
  3. With your needle, you are going to go under strand 1, over strand 2 (see yellow arrows), and then pull strand 2 back under strand 1 (see pink arrows). (To say this a different way; the stitch on your needle comes from strand 2. When you make the stitch, you are pulling strand 2 through the loop on your thumb, under strand 1)

  4. Repeat until you have the desired number of stitches on the needle.

TIP: If your cast on stitches are too tight, use a larger needle to cast on, and then transfer to the needle you're going to use for the knitting. Alternatively, use 2 knitting needles when you cast on, and then remove one before knitting.

Sunday, January 9, 2011

Search for Knitted Ties

I'm not entirely sure how I feel about knitted ties. J. Crew has had some for sale in the past few years (around $50!) If I were to ever want to give Keith a knit tie (IF), it would be cheaper to make one myself. Since I was curious about what free patterns are available, I initiated this search.

I am limiting my search to classic looking neckties, not anything that can be tied around the neck.

The Patterns:
  • Knit Necktie - Seed stitch, skinny with a blunt end, "Easy" difficulty. (Note: you must register for a free Lion Brand account to view this pattern)
  • Striped Necktie - Knit in the round with self-striping yarn. The shape is of a skinny tie with blunt ends. (Note: you must register for a free Lion Brand account to view this pattern)
  • Traveling Rib Tie - Ribbed. Classic Shape.
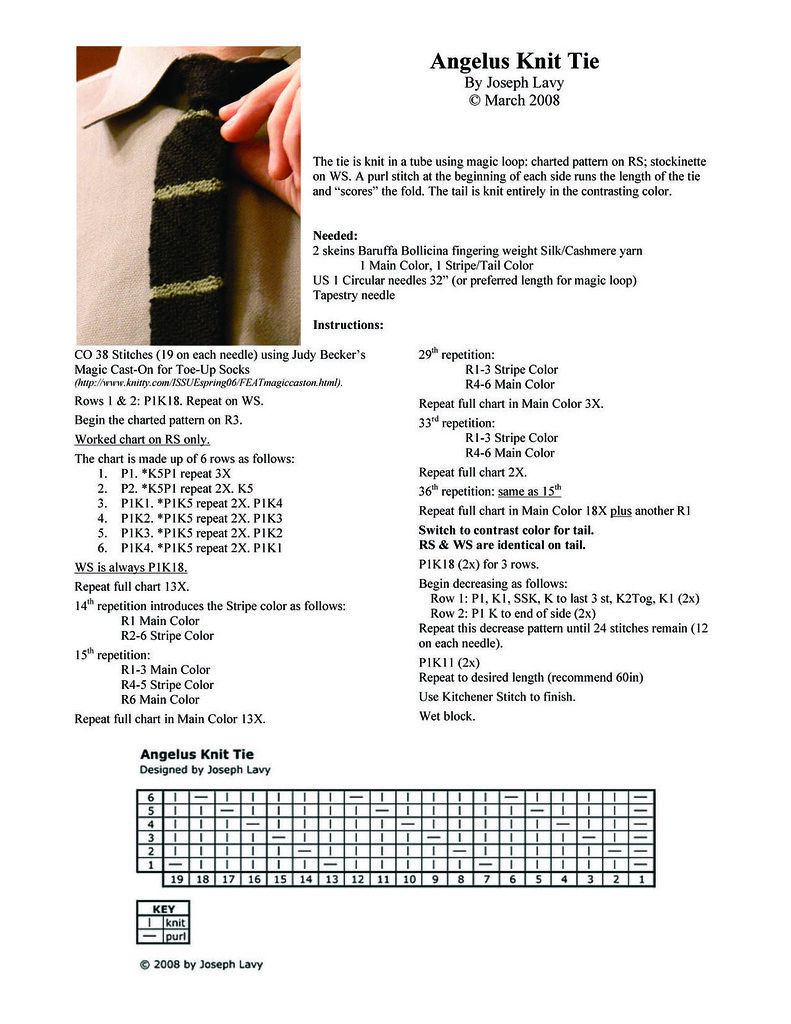
  • Angelus Knit Tie - This is double layered, but is not knit in the round. It is folded in a similar way you would see with a traditional tie. There is nice texture on this garment. Bias pearled stripes.
  • A Silk Tie - Very classic tie shape with bias stripes.
  • Knit Bow Tie - Just as it sounds!
  • Men's Bias Knit Tie - very classic shape, diagonal stripes.
  • Dad's Knit Tie - Straight, skinny.
  • Bowtie Tie - This is not a bow tie. This is a tie that has a bow tie design on it. Classic shape. The first I've found with a color design other than stripes.
  • Wool Bam Boo Striped Tie - stockinette with stripes. A pointed end (which looks like it was folded and sewn? I didn't open the pattern PDF to check). Skinny with a pointed end.
  • Prep School - The small size fits a child. Knit with sock yarn. Classic shape.
  • Tweedy Tie - Moss stitch, classic shape, point.
  • His or Her Silk Necktie - Skinny, blunt ends.
  • The Easiest Bow Tie Ever - Caroline would like this one a lot, as it is modeled on a baby!
  • Unisex Skinny Tie - Multiple stitches cast on, knit width-wise.
  • Chamber Tie - A cable down the center.
  • Man's Tie in Party Ribbon - Garter stitch, pointed end.
  • Hermione's Tie - Knit in Griffindor colors, cute eyelets in the center.
  • Hogwarts House Tie - V-Shaped stripe, can be done in any of the house colors.
  • Baby Necktie - So this is more for a young child than an infant, but it is a cute mini-tie that you can tie in the back with a strap. Add a paperclip to make it "clip on"
  • Retro Knit and Striped Tie - This one has a loop on the back so the back of the tie stays in place. Striped and Skinny.
  • 1914 Gentleman's Knitted Tie - Spotted, classic shape from a vintage pattern.
  • Cotton Tie - You need to scroll all the way to the right to see the pattern for this classic shaped tie.
  • Gentleman's Knit Tie - Classic shaped. (The designer's first published pattern!)
  • Knitted Necktie - Classic shape and even worn to a prom! (see photo)
  • Houndstooth Check Tie - Hurray! A Pattern! Houndstooth pattern. (Note: you must register for a free Lion Brand account to view this pattern)

Patterns available for free on Ravelry (create a free account, every knitter should use that website!

Enjoy!